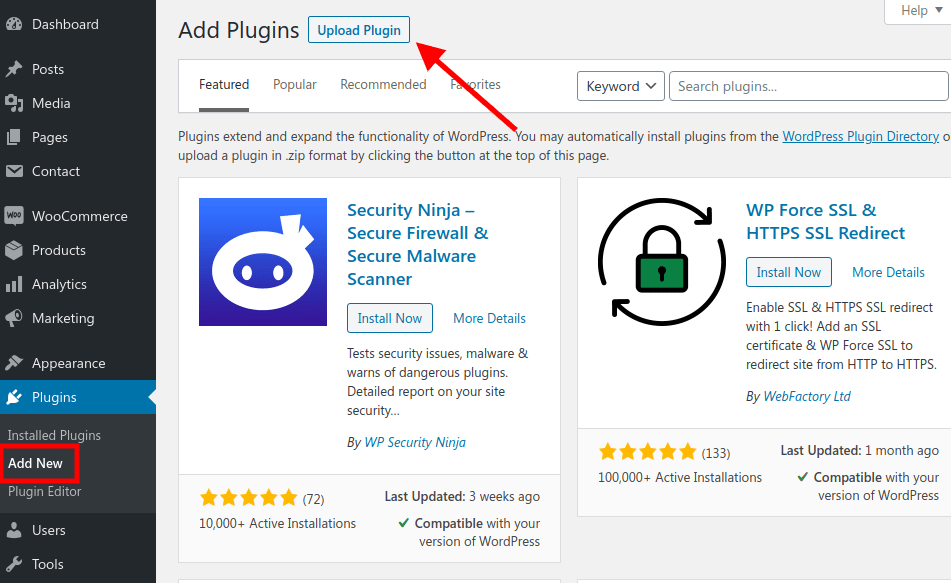
Download the zip file of the plugin from the repository. After go to the admin part of your site to the Plugins - Add New page.
To open the file uploading form click the «Upload Plugin» button on the top.
Plugin installation
After select the downloaded zip file in the form lower, submit it and click «Activate» button.
The next you might need to check is the plugin settings.
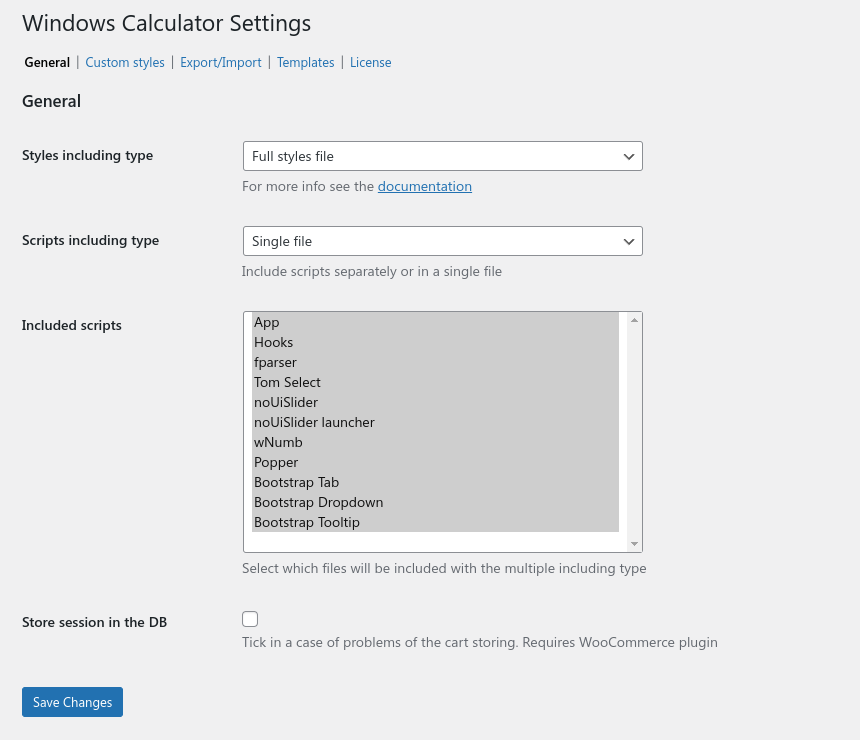
Plugin Settings
Main Settings
You choose the styles that will be included in the plugin.
«Full» is the self-sufficient style file. It applied all
required styles to the plugin's elements.
«Basic» styles are fine for you if your active theme is
based on the "Bootstrap 3/4/5" framework. In this case, this calculator's style will be inherited from your
active theme's. Despite this, you can also add your own CSS-styling rules.
«None» value doesn't include any styles at all. In this
case, you can create a full custom CSS-style from the plugin sources and tools or by your own approach for
styling.
«Custom styles» include the file with your custom styles
such as colors, font-size, and so on. To modify it, go to the «Custom styles» sub-page.
The plugin is made using the newest ES6 modules scripts, so there is a setting to select «Scripts including type» - that could be a raw JS sources or build JS bundle.
Sometimes the server's configuration might face problems with the stored sessions.
For example, the cart contents' disappears on a page refresh. In this case, tick the «Store session in the DB»
option. This setting works only if WooCommerce plugin is active.
General settings page
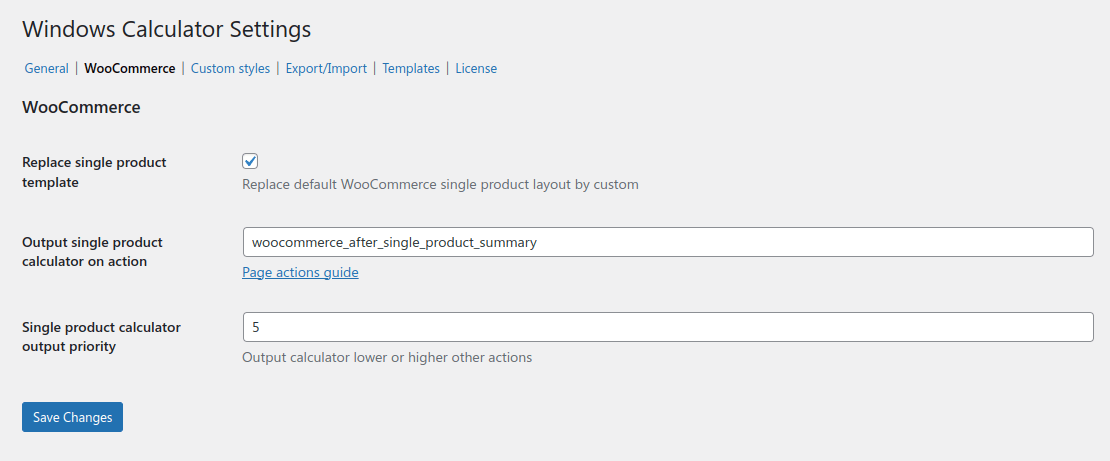
WooCommerce
If you use special Windows Calculator Combination type for your products, but default their template will be replaced by the build-in template pf the single product page. However, that's possible to disable this behavior making off the «Replace single product template» setting.
Use special setting to output the combination calculator in a random place use of the page using an action with a specific priority. There is a list of native WooCommerce actions to be used for that.
In case of using a 3rd-party visual editor to build the single product page, you can use a special module to output the windows calculator section. Visual editors are supported: Elementor, WPBakery, Divi.
WooCommerce settings page
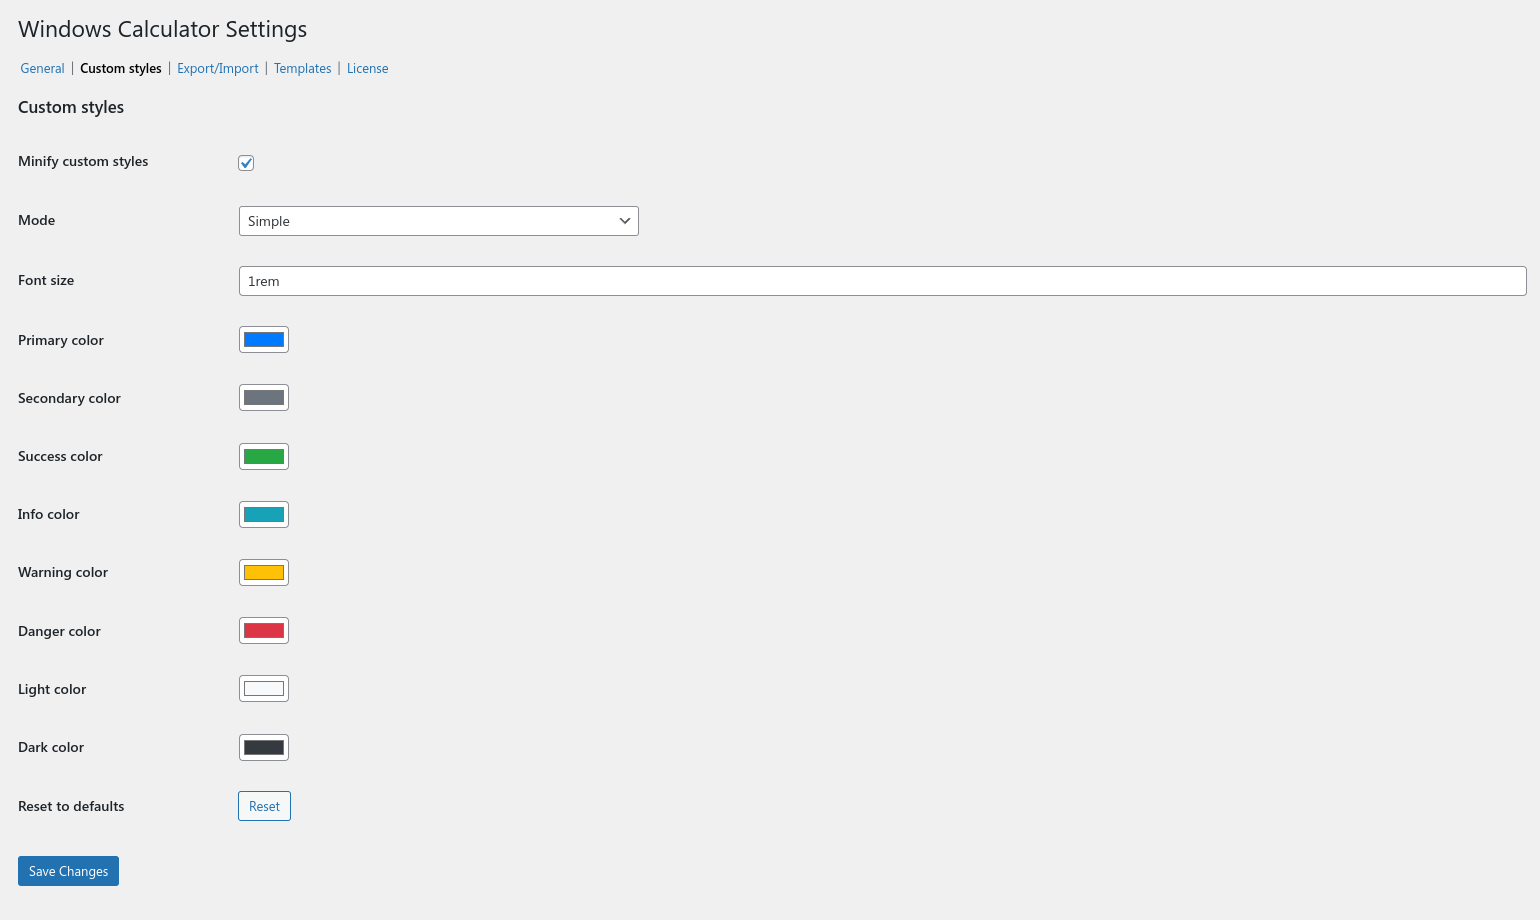
Custom Styles
It is possible to reconfigure the plugin's styles according to your needs.
Don't forget to choose a «Custom full styles file» value of the «Styles including type» setting to apply custom styles.
In case your styles are not shown correctly, disable the «Minify custom
styles» setting. In other cases, keep this setting enabled to keep the CSS-file smaller and save
your customers' traffic.
There are two modes for custom styling. The «Simple
mode» provides only a few main variables to change. The «Advanced mode» allows you to change a great
range of variables, but it requires CSS knowledge.
All the variables of the plugin are available to be changed
by using a text editor.
Sometimes the calculator's fonts look very small on specific themes. To resolve this
tune the «Font size» option. You can use any CSS units there, like "rem", "px", "pc",
and so on.
In a case of a styling-command error, you will see a message while saving. The
styling file will not be saved.
In case you need to reset your styles to their initial state, click the «Reset
to default» button once.
Custom styles settings page
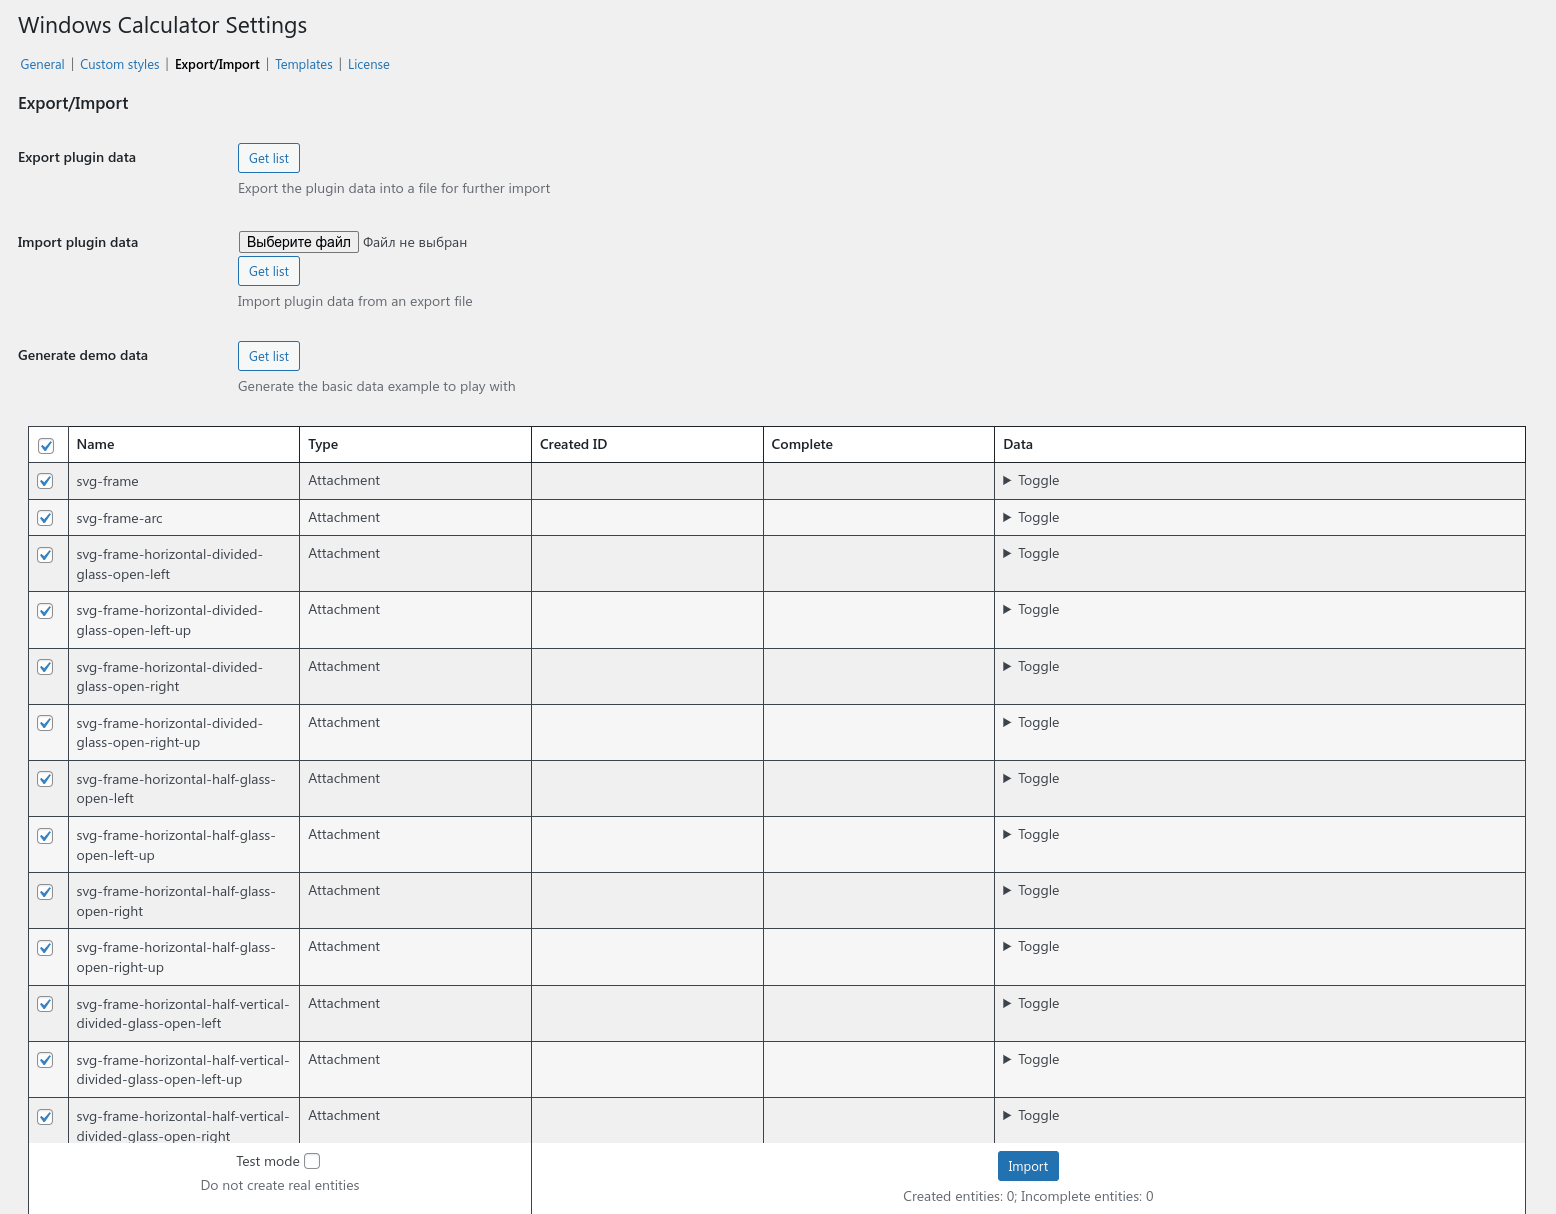
Export/Import
The first acquaintance with the plugin might be complicated due to the lot of settings available. To make this process easier, feel free to use the demo-data generator stuff.
To get the demo-data list, click the «Get list» button near the «Load demo data» setting. The list of entities to create will appear in the table lower. This table output all entities names, types, status, and full data dump. This is possible to select only specific entities to be created, but remember some of them depends on each other, so if disable some of the entities, others might be created particularly.
You can try the generation process using the «Test mode» launch. You will see each entity status individually in a special column. In case the entity isn't complete, you can find some red NULL strings in the entity data dump column. It'll help you to see what data isn't created.
With the «Update existent» setting on, the plugin will try to update the same labeled entities first, and only then create a new one.
The number of created and incomplete entities will be shown under the «Import» button.
That's also possible to migrate all created plugin data from one site to another. Use the export file from the source site on the target site.
The file will be parsed and in case of success the table of parsed entities will appear lower. You can also try the generation process using the «Test mode» launch to be sure the data can be created fully. In case of problems, you'll see the incomplete status of some entities.
All image attachments will be downloaded from the remote host and uploaded into your media library, so be sure the remote host is available at the moment of import.
Remember, the script downloads and uploads only images that are defined in the settings. Images from the content part will not be replaced. You'll need to download them manually. There is the Cope-Paste Helper plugin makes this process must easier. It can download external images and replace them in the post content via one click.
Export/import data page
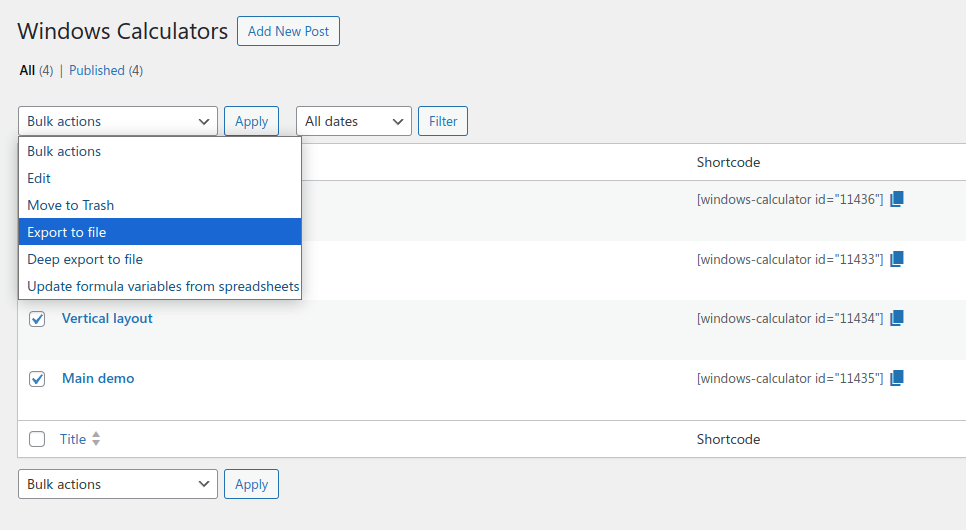
All posts of the plugin support bulk actions to make export files. To do that, select a few posts you'd want to export, and run one of the available export actions.
There are two modes to export entities available: fast and deep.
While doing a post via Deep export, the final file will also have all entities related to the exported post.
While the Fast export only selected posts without related entities. If it has relations with other posts, the plugin will try to compare and connect them by these posts' name.
Entities list bulk actions
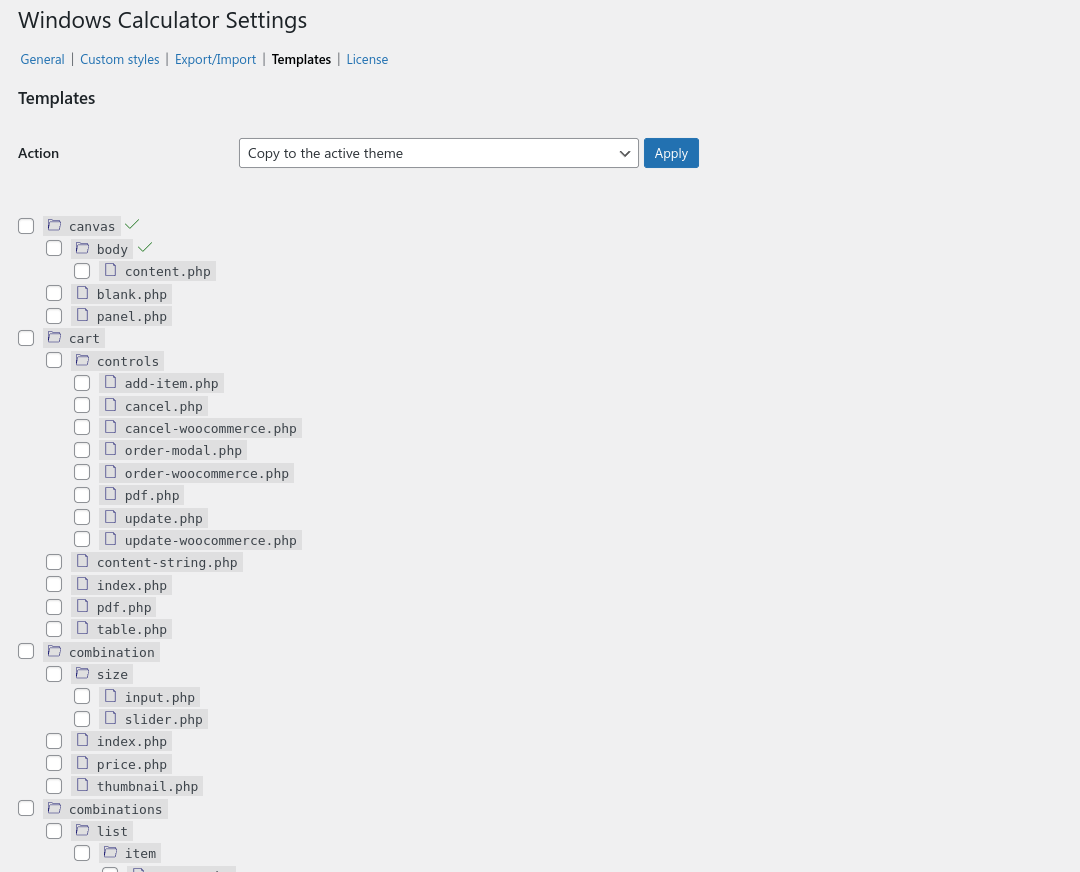
Templates Customization
Window Calculator plugin has a folder of views that are used to be shown on the front of the
site. There is a possibility to customize them as you need and keep the changes while
the plugin updates.
To do this, select files that require customization in the views list and apply the «Copy to the
active theme» action in the form above.
Selected views will be copied into your active theme in the windows-calculator
folder saving the sub-folders structure. Files copied to your active theme will
be marked by a tick icon.
The plugin firstly searches for a specific view in the theme's folders, and if
it doesn't find the view
there, it gets the view from its own directory.
You can edit the copied views using the «Appearance - Them editor»
page.
If you want to delete some views from your active theme, choose them in the views
list, select the appropriate point in the form dropdown above and apply the changes. The view
will be removed from the theme and the plugin's view will be used instead.
Keep in mind, the plugin can have changes in the view files while updating. So
if you have customized ones, some of the new features might work wrong. That
way, just copy them from the plugin and adjust to your needs once again.
Templates customization settings page
Product Settings
Basic Settings
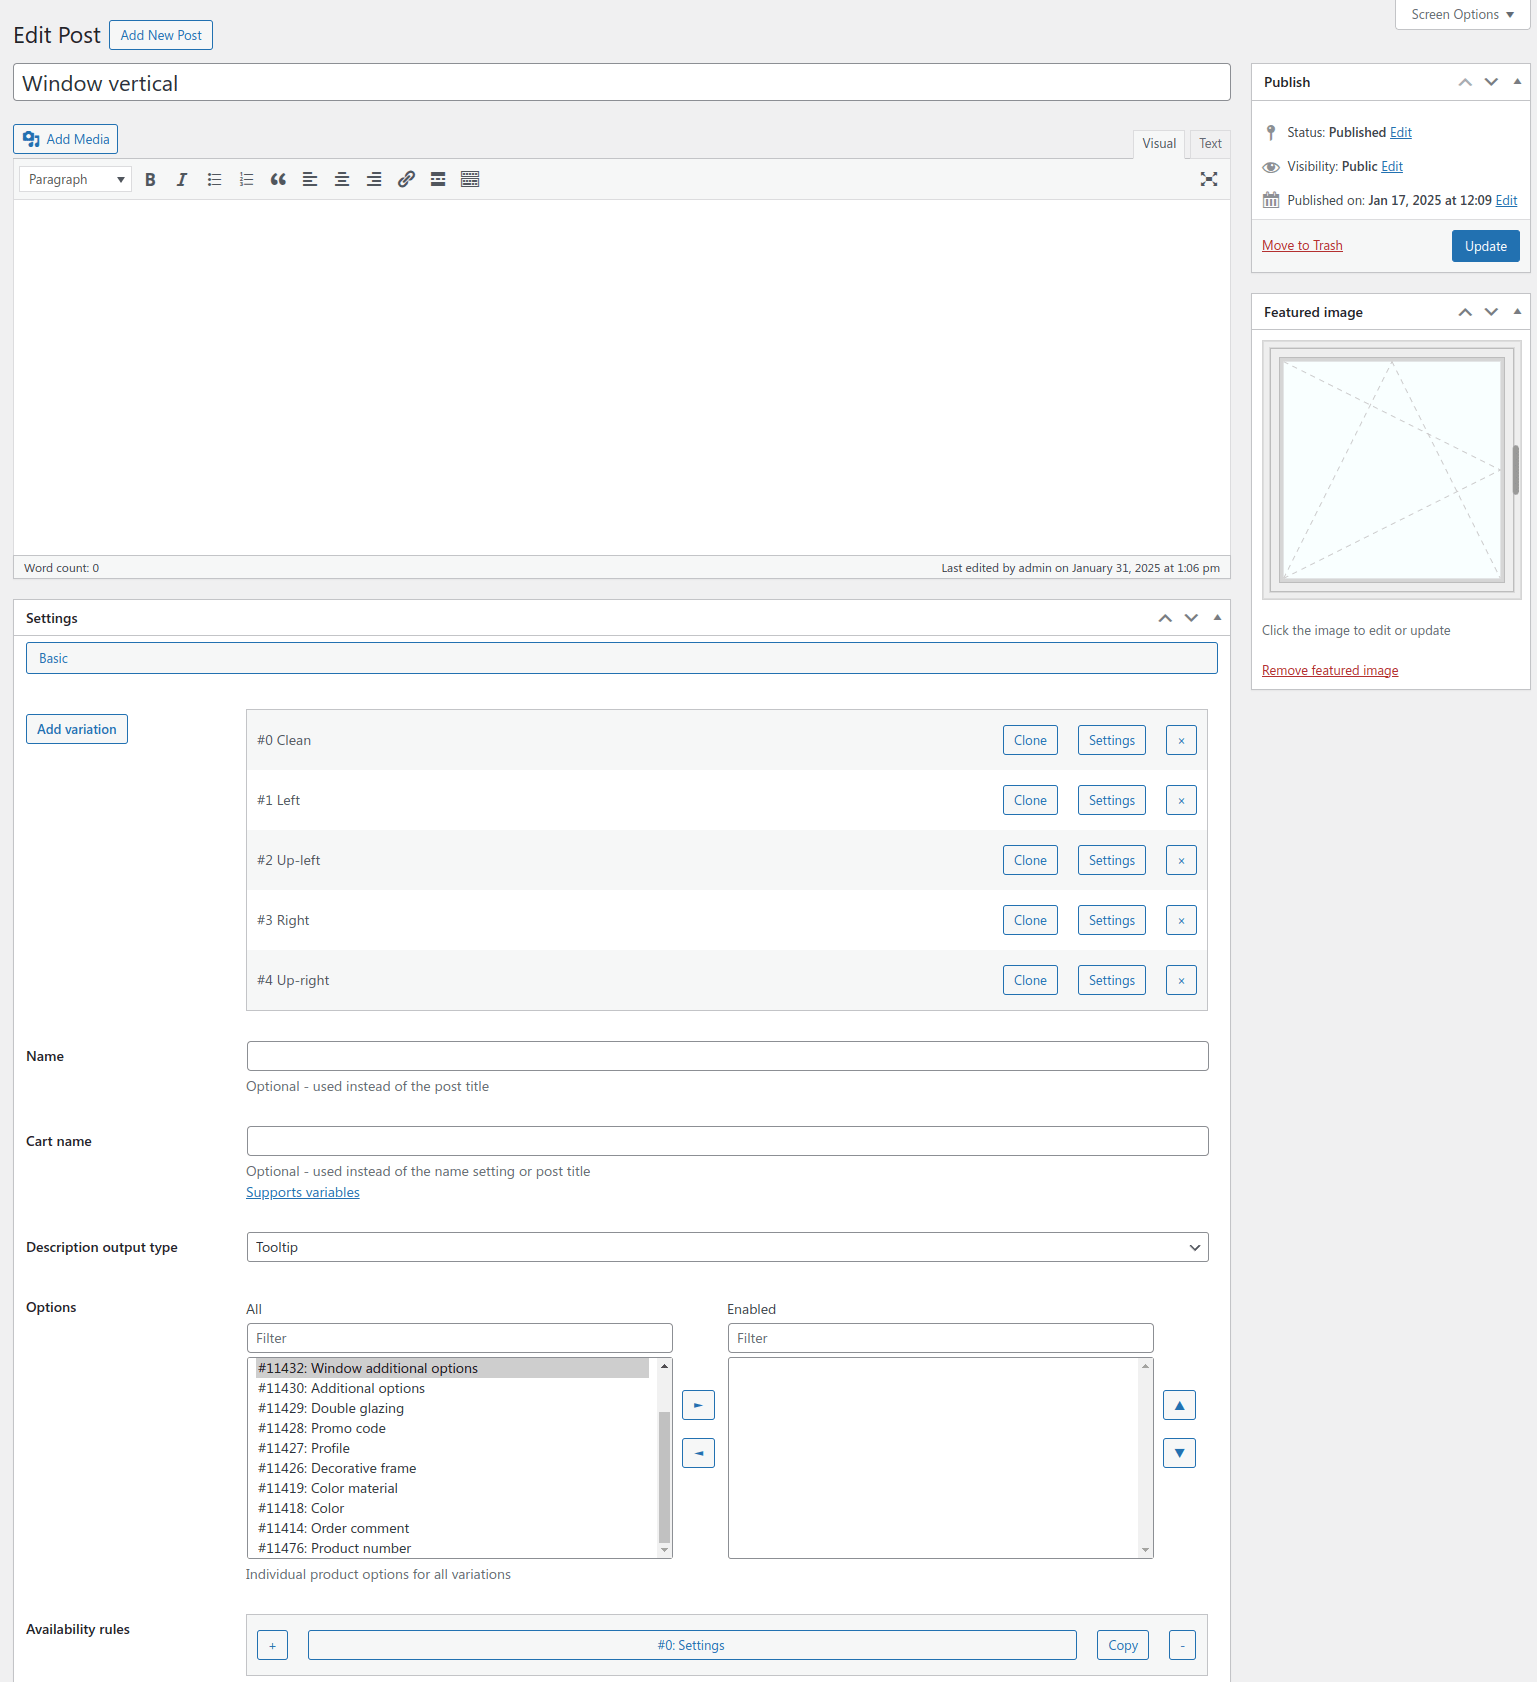
The first step of work with the plugin data is the creating of a simple product with variations.
Each product have the following settings:
Variations setting controls what variations will be available to select for the product. Each product must have at least one variation and can have only one active variation at once. There will be special controls available to select one of a few product variations.
Variations indexes are incremented while adding new items. In case you need to sort the variations and re-index them, click the «Re-order variations» button once.
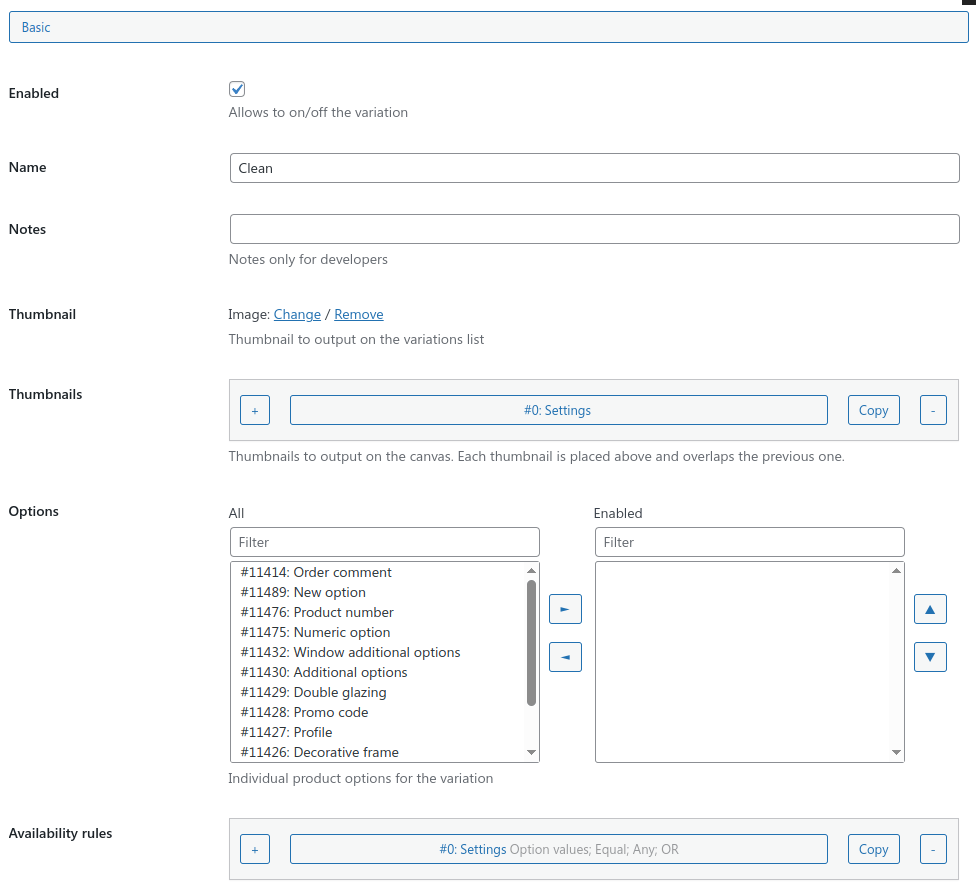
Thumbnail will be used on a combination canvas;
Name setting allows to re-name the product for the output but have a different inner post title. That might be helpful for managing a lot of products;
Style setting allows to modify CSS properties and variables of the product.
Product basic settings
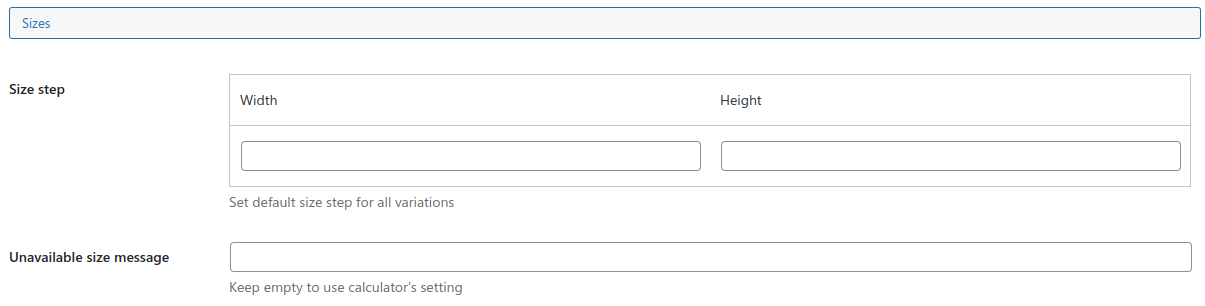
Sizes Settings
Size rounding step - affects on width/height size steps with individual pricing mode;
Unavailable size message to output a string if the current product size from the Prices table have an empty price. Allows overriding the calculator-level message for that product individually.
Product sizes settings
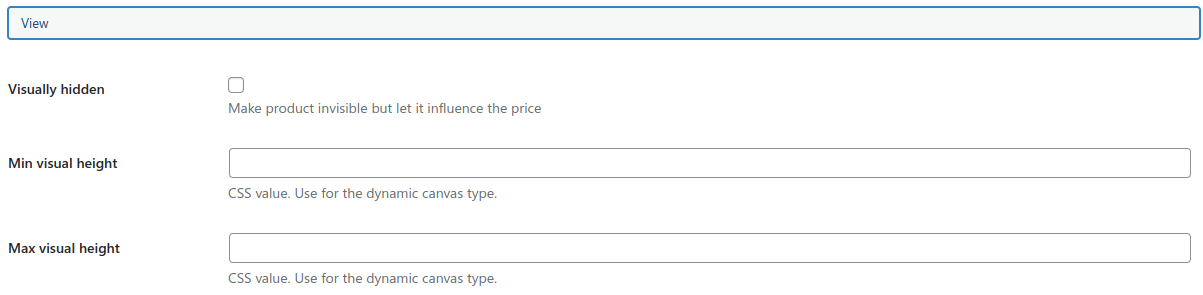
View Settings
Visually hidden makes the product invisible on the canvas, but it still will affect the price and the cart item.
Min/Max visual height settings allow preventing making dynamic sized products too tall or low. Use a CSS value with unit, for example, 20px, 5rem, etc.;
Product view settings
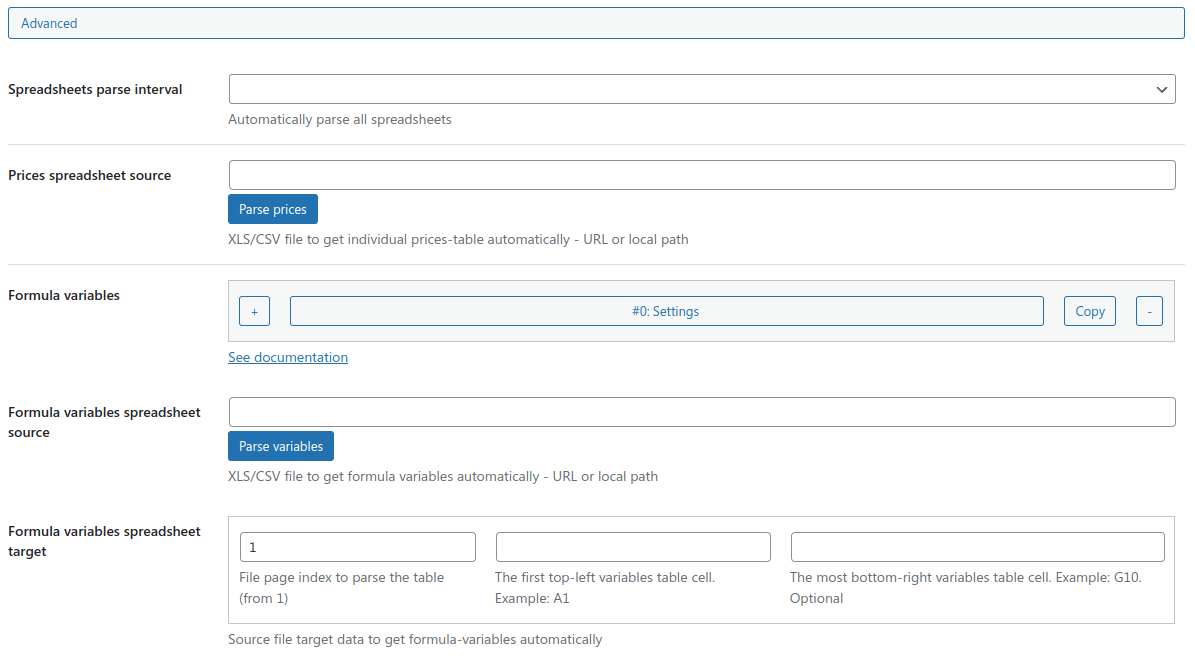
Advanced Settings
Spreadsheets parse interval allows selecting a period to parse product spreadsheets automatically.
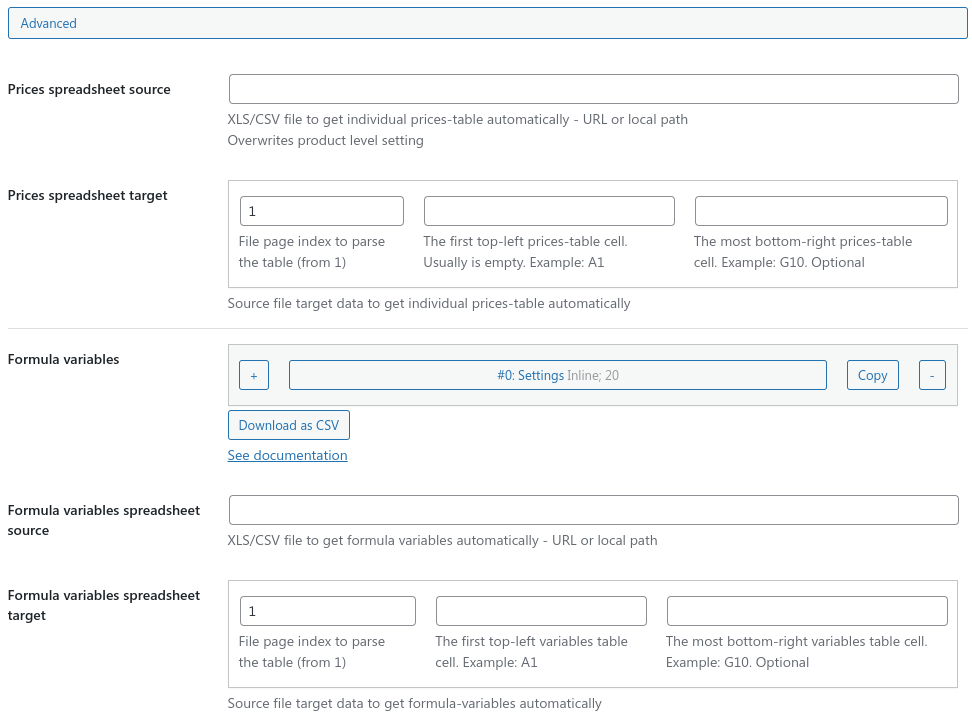
Prices spreadsheets settings allow to use a source spreadsheets file with individual variation prices. To make this setting work, that's necessary to set the «Spreadsheets target» setting for the variations.
Then variation settings are handled you can use the «Parse prices» button near the setting to update the product prices. You also can use the «Update prices from spreadsheets» bulk action for the products to handle a few products at once;
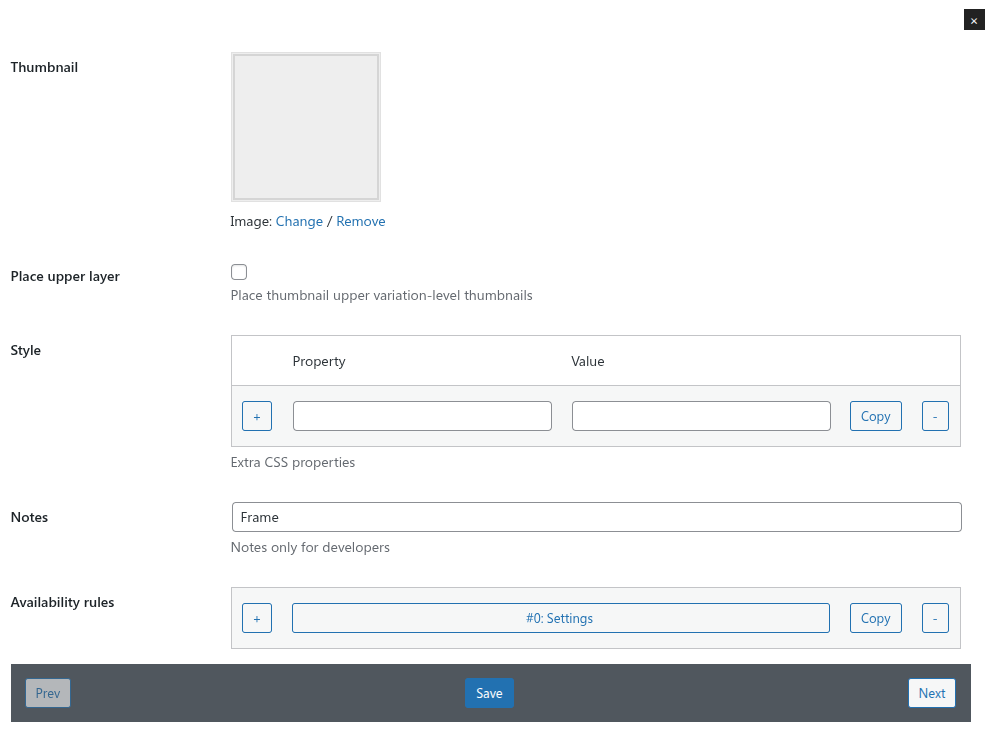
Canvas thumbnails are used to represent appropriate product view on the combination canvas. This is possible to have many thumbnails as layers overlapping each other. For example, to output window frame as the bottom layer, window glass as a middle layer, and window opening direction as the upper layer. At the result user will see the combined image made of these thumbnails.
Each canvas thumbnail have the next settings:
Thumbnail setting to select an image to output. There are a few default images available with the plugin, but you also you can use own images.
Place upper layer setting is available only for product-level setting and could be helpful in case you need to have a thumbnail for all product variations, but placed upper variation-level thumbnails. By default, variation-level thumbnails have an upper layer and overlap product-level thumbnails.
Style setting allows to modify CSS properties and variables of the thumbnail.
Initially, all thumbnails covers the whole product with its 100% width and height. There are a few native CSS variables used:
--wincalc-product-image-top: 0;
--wincalc-product-image-right: 0;
--wincalc-product-image-bottom: 0;
--wincalc-product-image-left: 0;
--wincalc-product-image-width: 100%;
--wincalc-product-image-height: 100%;
--wincalc-product-image-transform: none;
For example, if you need to make a thumbnail cover only top half of the product, set style settings:
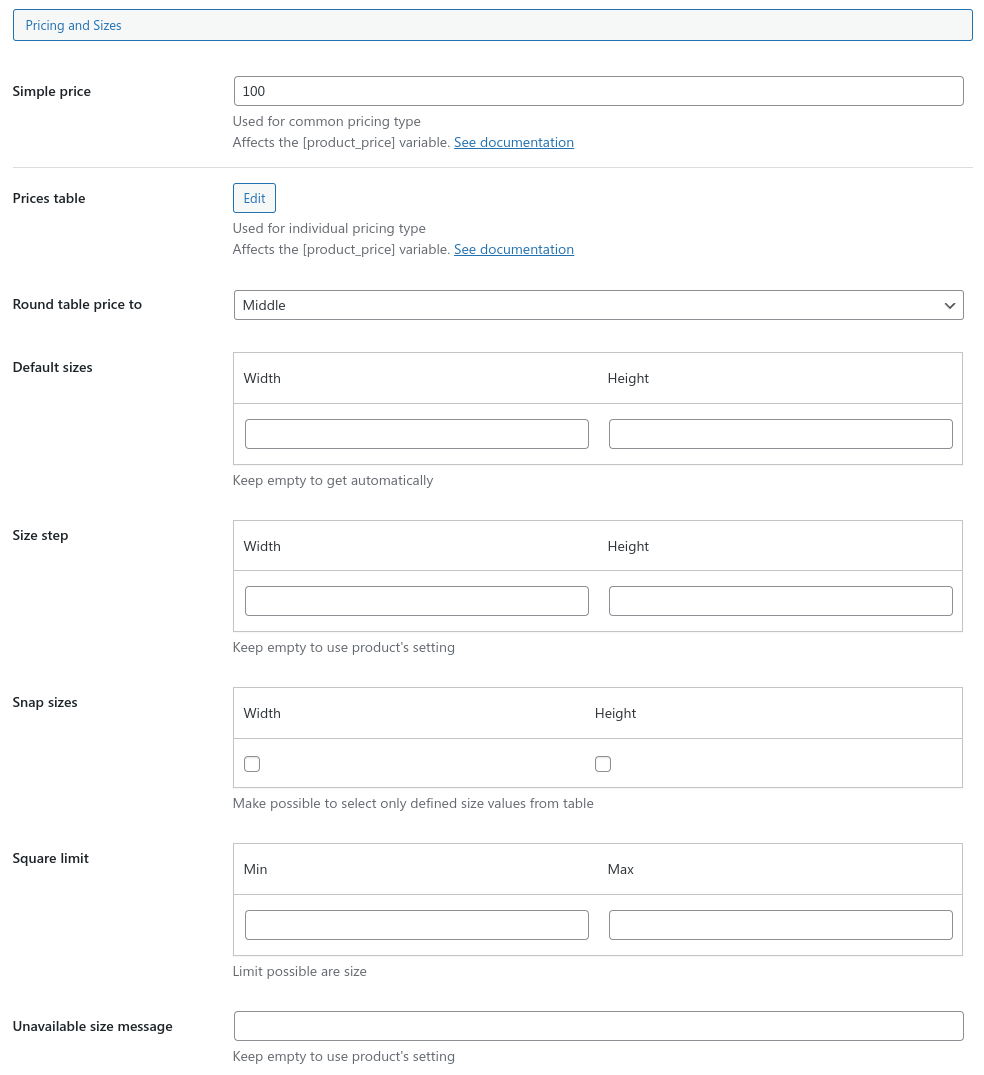
Style setting allows to modify CSS properties and variables of the product variation.
Product variation basic settings
Pricing and sizes
Simple price stores one numeric value and is used by the common pricing type combinations;
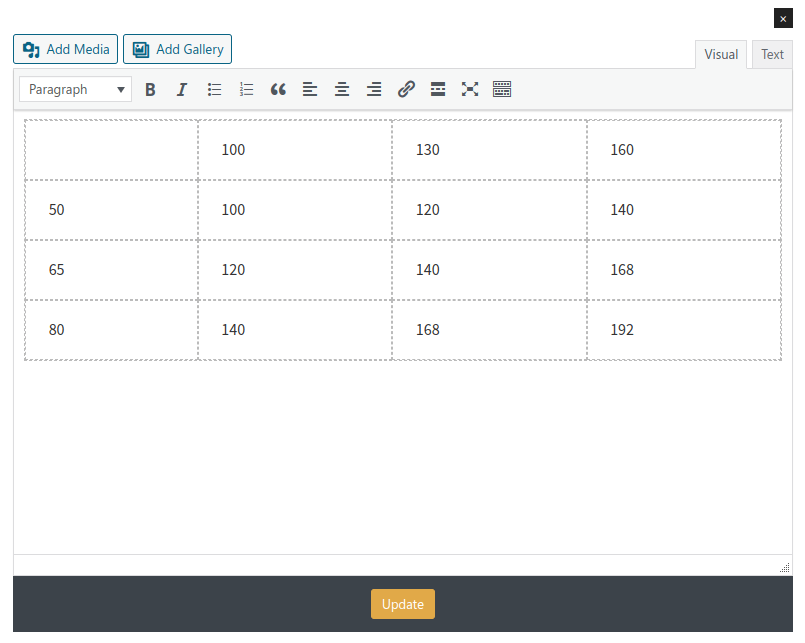
Prices table stores the table of widths, heights, and prices, and is used by the individual pricing type combinations.
To set these prices, just paste an HTML table of widths, heights and their prices in the editor field.
Each new variation will have a sample of the table in the editor field. See more info about
the table;
Round price to sets what price will be used, then product size is in between the individual prices table values.
The product can have the closest upper/lower size price or change it right in the middle between the near sizes;
Default sizes allows defining default width and height of a variation. Alternatively,
the average values from the table will be taken for this;
Snap width/height settings allow making selectable only sizes listed in the price table. It means that will not be possible to select a size in between of two height or width values;
Square limit settings allow making specific minimum and maximum product size square unavailable to be ordered;
Unavailable size message to output a string if the current variation size from the Prices table have an empty price or Square limit is reached. Allows overriding the calculator and product-level messages for that variation individually.
Product variation prices and sizes settings
Advanced settings
Price spreadsheets settings allow to use a source spreadsheets file with individual variation prices. This setting works the same as for the product level and just overwrites it. That's not necessary to use this setting if you store all price-tables in a single file.
Then the settings are handled, you can use the «Parse prices» button near the Spreadsheets source product setting to update the product prices. You also can use the Update prices from spreadsheets bulk action for the products to handle a few products at once;
Individual pricing mode allows defining minimum and maximum product sizes and a price for each of them. At the result this will be possible to select a required width and height for each specific product of the combination.
The price of the selected product width and height will be found in the price table and used to calculate the total of the combination.
Here is an example of individual prices HTML table.
The first row means the widths range and the first column is heights. The prices are in the cross of these sizes.
Product variation price table
Combination Settings
Basic Settings
All combination have the following settings:
Thumbnail will be used in a combinations list.
Name setting allows to re-name the combination for public but have a different admin post title. That might be helpful for managing a lot of combinations.
The most important setting of a combination is Pricing type. It allows using two different modes of providing products.
With the Common (or Shared) pricing type, you can output any number of products, but without any size handlers for any of them. Product variation Simple price setting will be used to calculate the total amount of the selected product variations. However, that's possible to output common width and height handlers around all products, and then use the selected size to modify the final amount via the formula variables setting.
While the Individual pricing type outputs all products with individual size handlers. The Prices
table setting is used to provide the sizes range and their prices. That way, your customers can select a specific size for each product individually.
Both modes allows adding additional elements, as inputs and sliders.
Price rounding step setting allows setting the possible step of the price change.
Load products price via AJAX reduce size of HTML output and requires products prices at bit later. When loaded it recalculates all variables.
Scopes shared max values setting allows to define the list of scopes and max values they can achieve.
For example, if scope 1 indicates total combination width and scope 2 indicates total combination height, and you need to make them to not be larger than 2000 and 3000. To make it: scope 1 <= 2000 while scope 2 <= 3000, or scope 1 <= 3000 while scope 2 <= 2000.
For that case, set scopes IDs setting to "1,2" and max values setting to "2000,3000".
Unavailable size message setting is used in case the combination have an unavailable size, such as scope shared max value.
Combination pricing settings
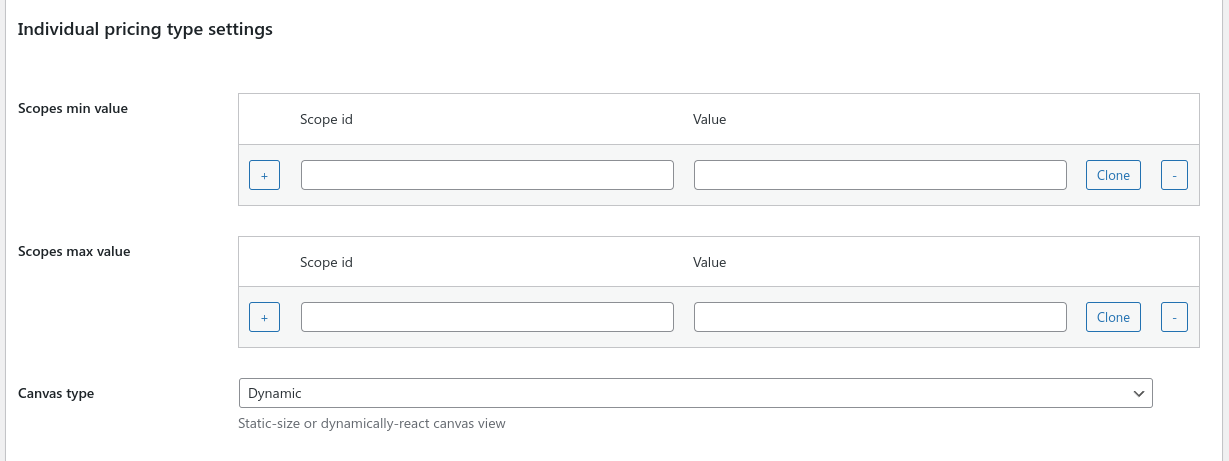
Individual Pricing Type
Individual pricing type have the following settings:
Scopes max values - allows limiting the max sum of the scope's products.
Define a scope ID in the left field and max value in the right one, then the sum of these products
will not be more than this value.
Scopes min values - allows limiting the min sum of the scope's products.
Define a scope ID in the left field and min value in the right one, then the sum of these products
will not be less than this value.
Individual pricing type settings
Common Pricing Type
Common pricing type have the following settings:
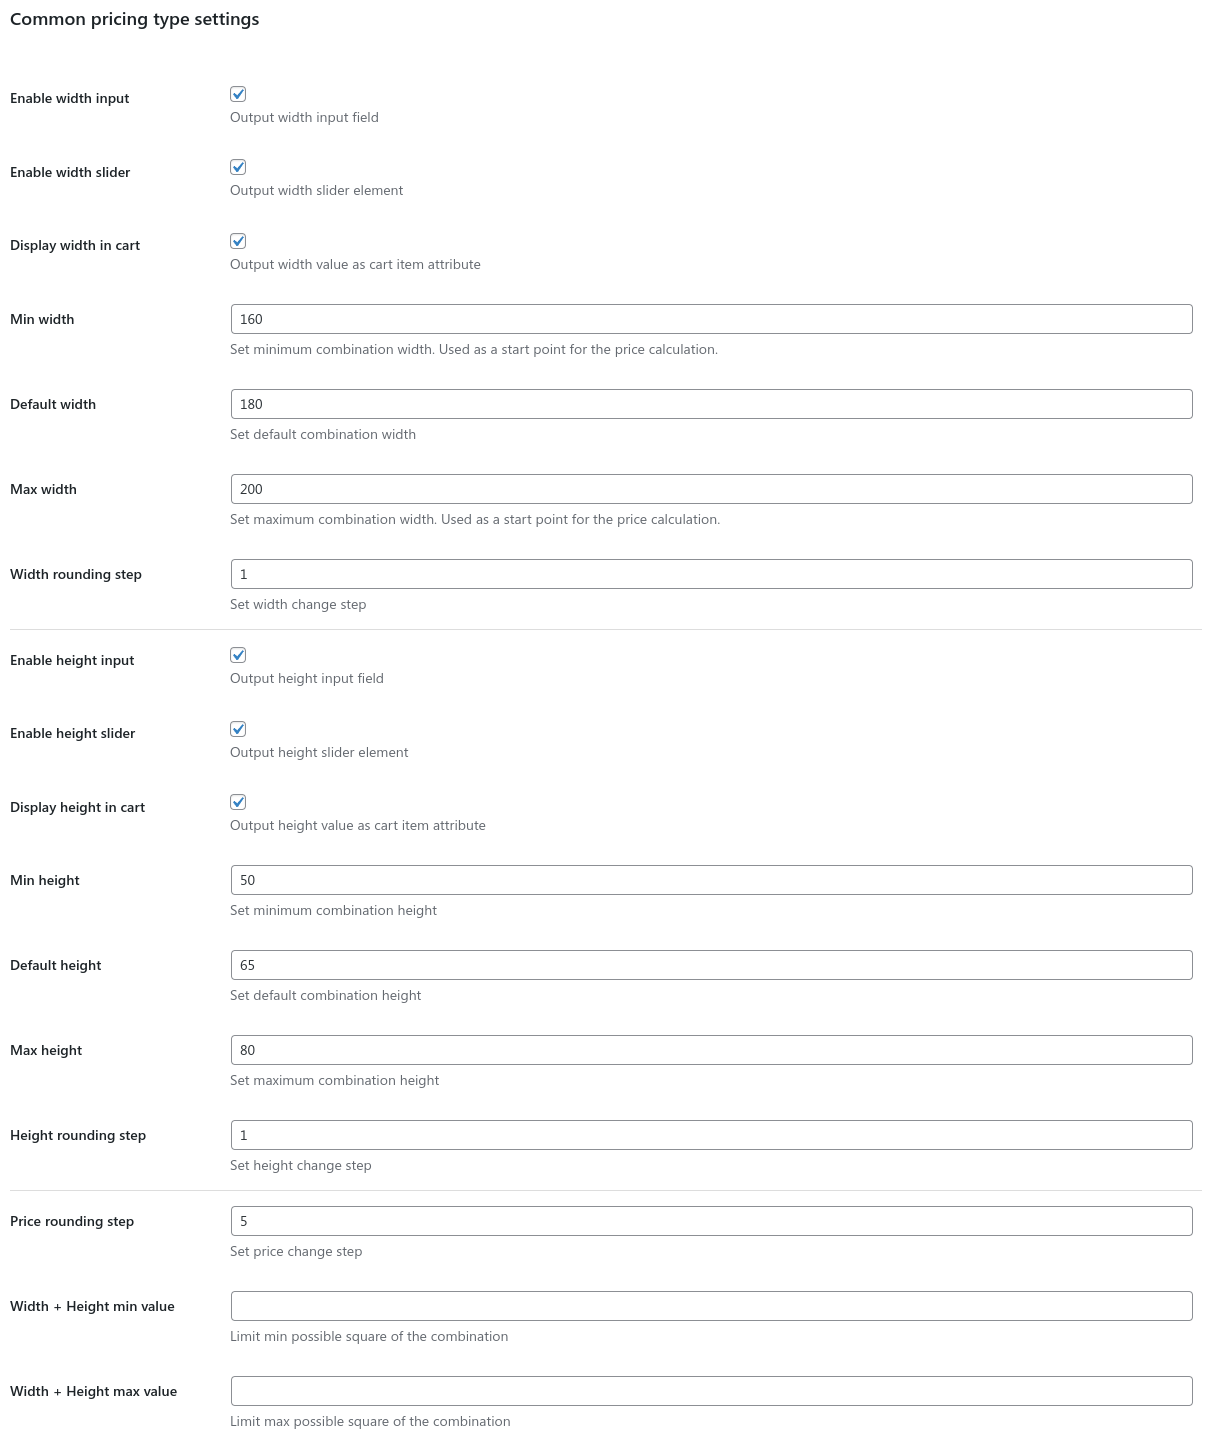
Enable width/height input/slider - this is possible to on/off each specific sizing element for the combination;
Display width/height in cart - settings allow to show/hide combination size in the cart;
Min Width/Height - set minimum combination size to order;
Max Width/Height - set maximum combination size to order;
Default width/height - set default combination size values;
Width/Height rounding step - allows setting the possible step of the size change;
Width + Height limit - these settings allow limiting the minimum and maximum combination sizes. This setting doesn't allow to set a larger/smaller sum of width and height. Define the sum of width and height;
Square limit - allows limiting the minimum and maximum combination square. Define the multiplication of width and height. This setting outputs the "Unavailable size message" setting value in case of error.
Common pricing type settings
Layout Settings
There are two main types of canvas: Static and Dynamic. The static type isn't changed
visually while product's size adjustment. Meanwhile, the dynamic type makes products have and change their
visual sizes accordingly to their current size.
Decide which type you want to use before the adding of items on it.
Types support
Common pricing type supports only Static canvas type. While individual pricing type supports Both types.
Both modes have Generate thumbnail control to generate an image from the canvas and use it as a combination thumbnail.
You also can delete currently used thumbnail attachment during generation.
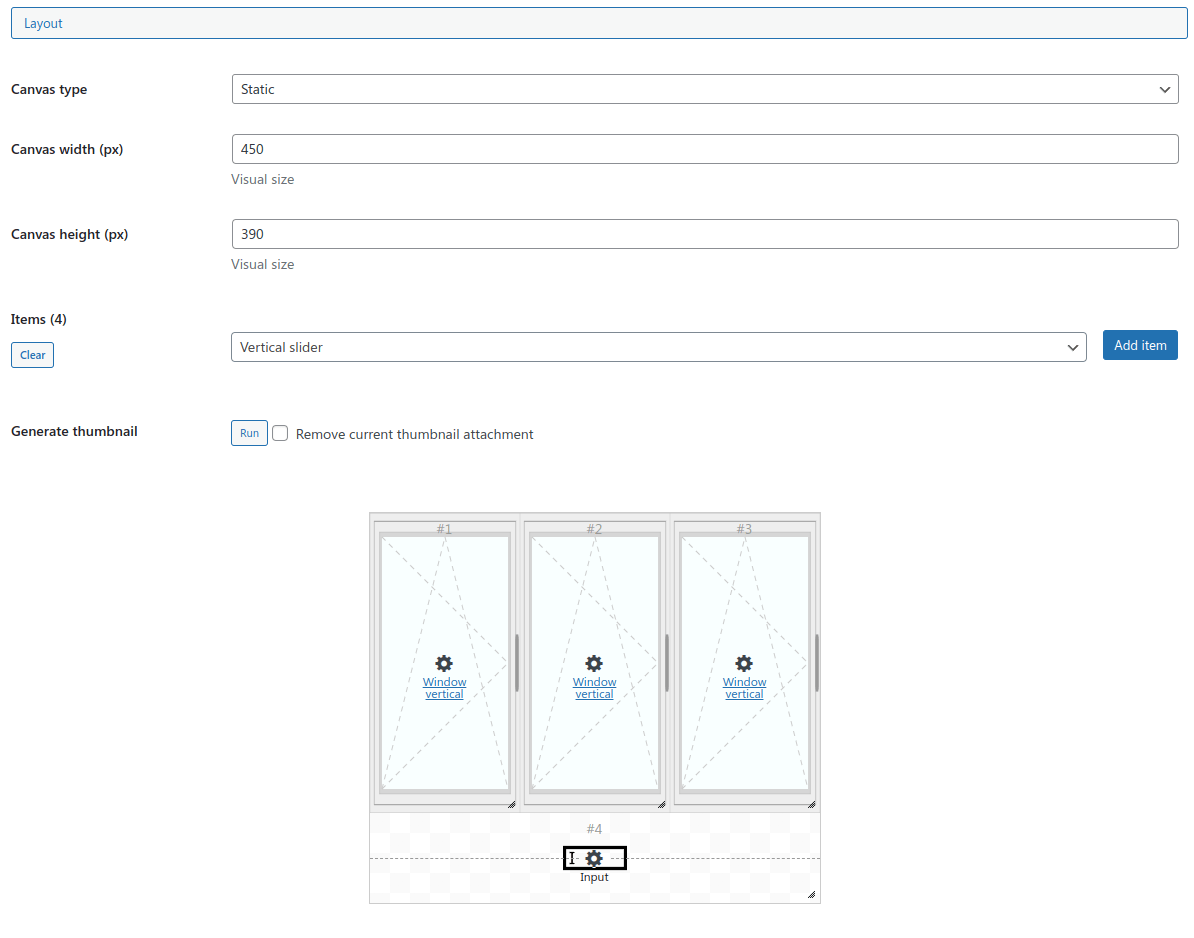
Static canvas type
Select a product or utility to add it on the canvas and click the «Add item» button. All of these
products you see on this list are taken from the Windows Calculator - Products section.
Also, there is a list of helper elements to use on the canvas, such are sliders, inputs and size rulers.
Set the product position and size on the canvas by changing X/Y/Width/Height values.
Also, you can use the mouse for changing these options.
Will be better to fit the canvas size for its products to shorten the white space in it.
Combination static canvas
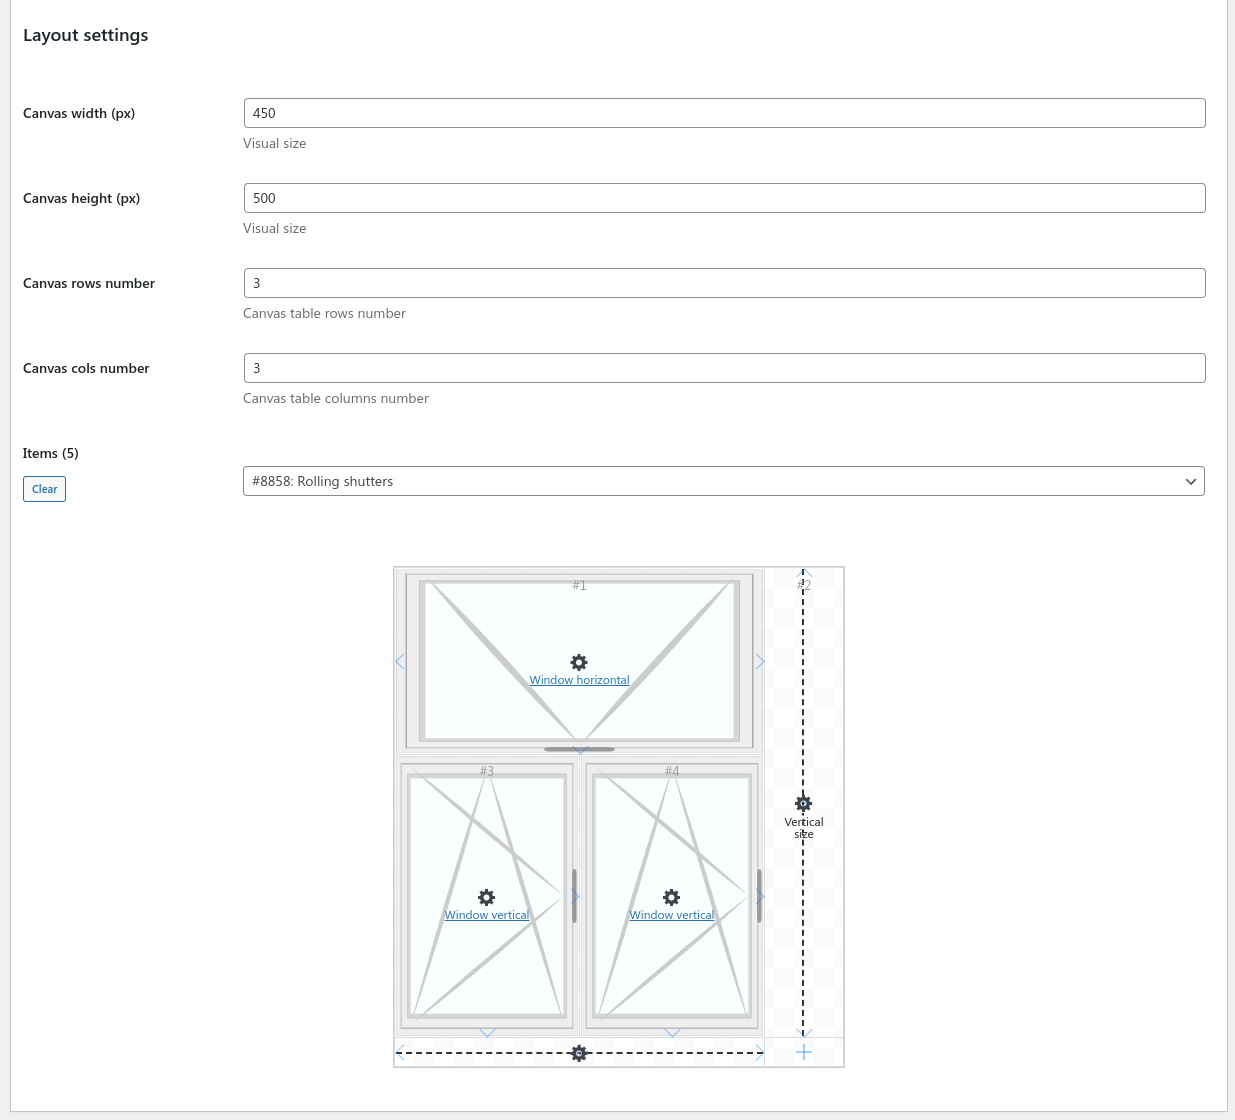
Dynamic Canvas Type
Dynamic canvas is based on a table layout. Each cell of it might have nothing or one item within.
Use rows/cols number settings to change the table cell number. Cells might be extended right or down if there is a space to do this. Use right and down cell arrows to do this. Extended cells might be reduced back using left/up arrows.
Select a product or utility to add it on the canvas and click the plus button of a cell - the item will be added within. All of these products you see on this list are taken from the Windows Calculator - Products section. Also, there is a list of helper elements to use on the canvas, such are sliders, inputs and size rulers.
This is also possible to change the horizontal/vertical alignment of each cell using the special fields.
As the canvas is dynamic, its "height" setting might be ignored for the combination output.
Combination dynamic canvas
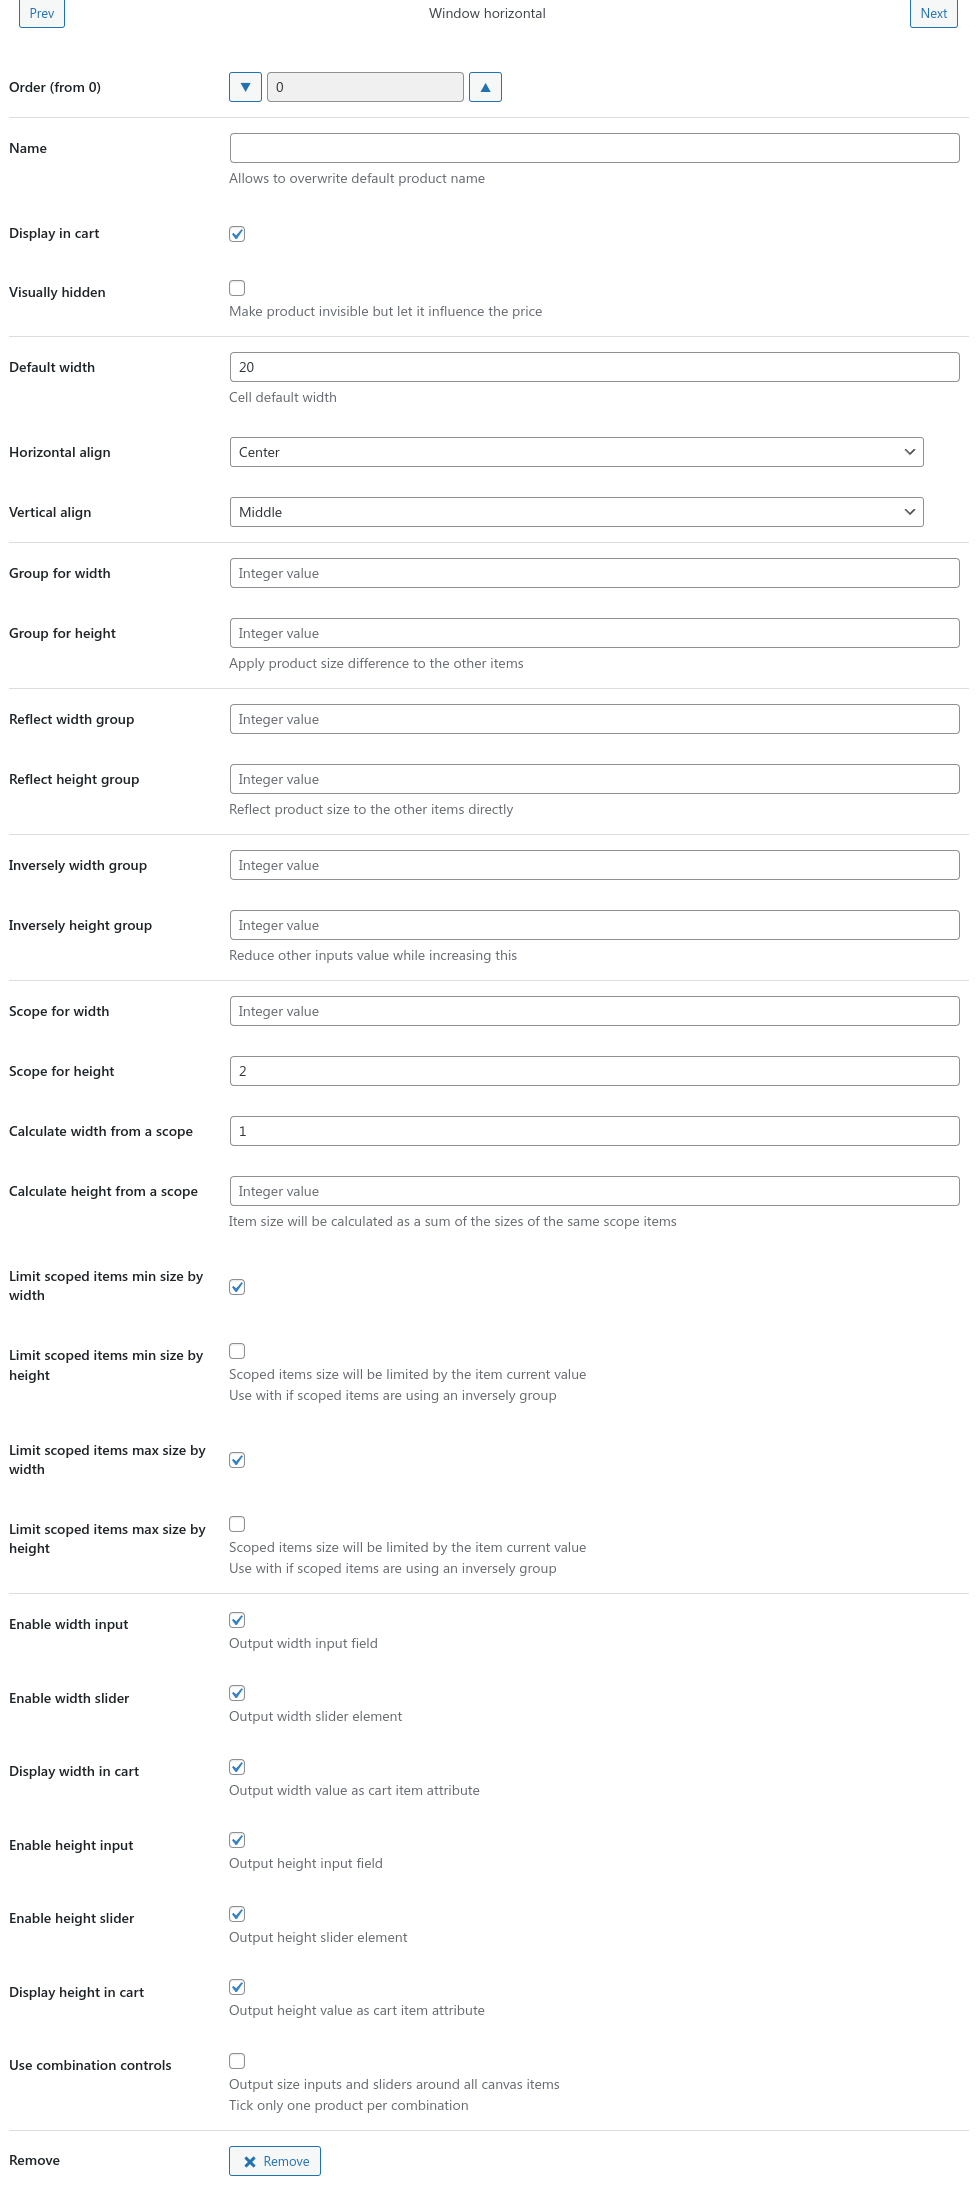
Canvas Item Settings
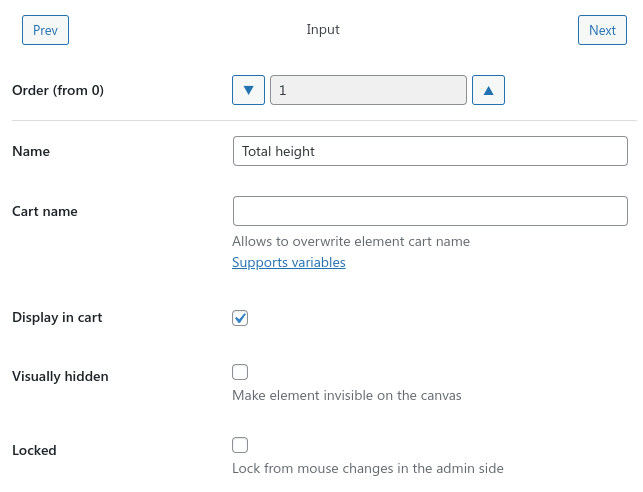
Order setting of any element on the canvas affects on the items overlapping and cart item data order;
Show in cart - controls item presence in the cart item properties;
Visually hidden makes the product invisible on the canvas, but it still will affect the price and the cart item;
Locked setting makes the element not draggable in the admin part to avoid miss moves;
Availability rules to control item availability. If item is a product its rules will be overwritten;
Style setting allows to modify CSS properties and variables of the item;
Enabled variations setting is available for products and allows to define what variations are available for that specific product. It's needed to define enabled variation IDs separated by a comma.
Canvas item settings
Dynamic canvas
Dynamic canvas products and elements have these additional settings:
Default width - indicates the default width the cell will have initially (only number);
Horizontal align - how to align cell content by the X axis;
Vertical align - how to align cell content by the Y axis.
Canvas dynamic product settings
Static canvas
Static canvas products and elements have these additional settings:
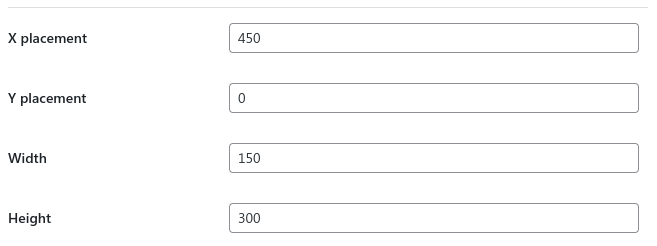
X/Y placement - where on the canvas the product is placed;
Width/Height - what's the product static size on the canvas.
Canvas static product settings
Individual pricing
Individual pricing type canvas product have a settings modal with the following:
Use combination controls - product will not use its own size inputs, but the inputs/sliders of the whole combination, namely placed around the items on the canvas.
Enable input/slider - this is possible to on/off each specific sizing element for the product;
Read only - make input possible to read value only and not to enter;
Show in cart - settings allow to show/hide product size in the cart;
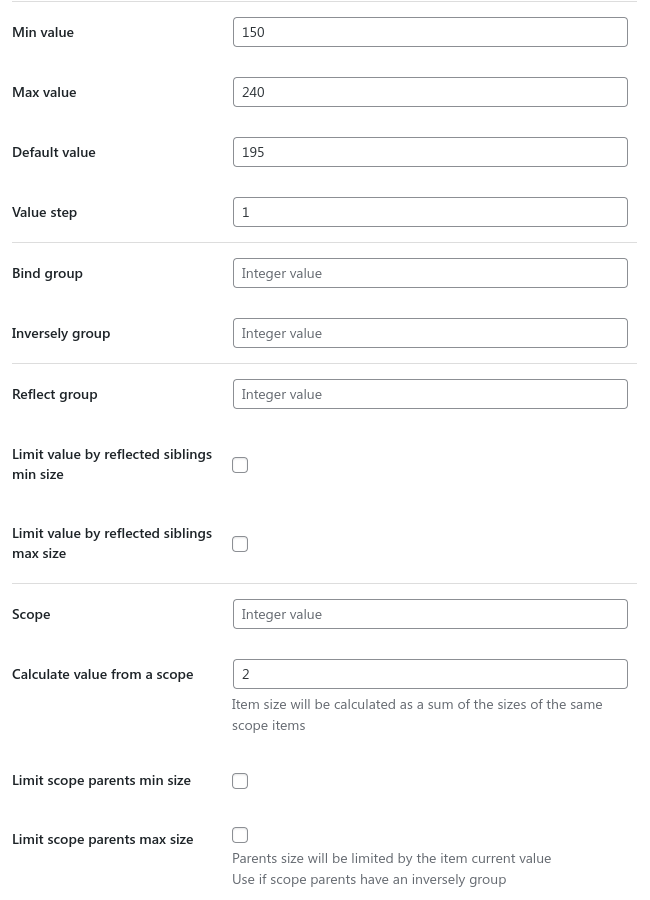
Bind group - these settings allow defining an ID of group of item values
which will be bonded to each other to synchronously;
Reflect group - these settings allow defining an ID of group of item values
which will be equal to each other while the changing;
Limit by reflected siblings min/max size settings are to not let the element value go out its reflected siblings;
Inversely group - these settings allow defining an ID of group of item values
which will be reduced/increased while changing the value of one of them;
Scope - these settings allow creating a scope of sizes to be connected with
elements having the same Calculate from a scope ID;
Calculate from a scope - set scope ID to calculate the element size as a sum of the scoped elements size;
Limit scope parents min/max size - allows limiting parent scope elements total value by their child (this element) min/max value. Inversely group settings can help to reduce one scope parent size while another is increased;
Limit min/max by scope parents total value - allows limiting child (this element) value by the sum of min/max values of its scope parents;
Reflect formula variable setting allows bind a size input with a formula variable. That means changing the input value will change formula variable value. The same time changing formula variable will change input value.
Show on thumbnail allows to output input value at the cart item thumbnail.
Pricing individual product settings
Canvas Utilities
There are a couple of util items available for use on the combination canvas:
Input element allows to output an input field with a defined range and value. Also, it allows using the same groups/scopes settings as for products.
Slider element allows to output a size slider with a defined range and value.
Input element have a few specific settings to set:
Show name outputs element name above the input. You can set it using the Name setting;
Decoration allows to output vertical or horizontal ruler lines around the input or set slider direction;
Read only setting will make the input to output the value only, but not enter.
Canvas input utility settings
All other settings work similarly to products, but have only one dimension, instead of width/height.
Also, that's possible to not define min and max values if element uses Calculate value from a scope setting. For that case, min and max values will be filled automatically.
Canvas utility settings
Canvas Item Presets
This is possible to save canvas product or utility as a ready to use preset with all pre-defined settings.
To create such open an item settings modal and fine "Save as preset" button at the bottom.
All presets will be available in the dropdown list of items, such as products and utilities. This is possible to remove preset using the "Remove preset button nearby.
Integration Settings
Attached WooCommerce product - if you want to make the possibility to order the combination using WooCommerce, you need to create a sibling WooCommerce product to be used as combination data container, to be added in the WooCommerce cart and have all combination properties.
There are also settings available for specific option types only:
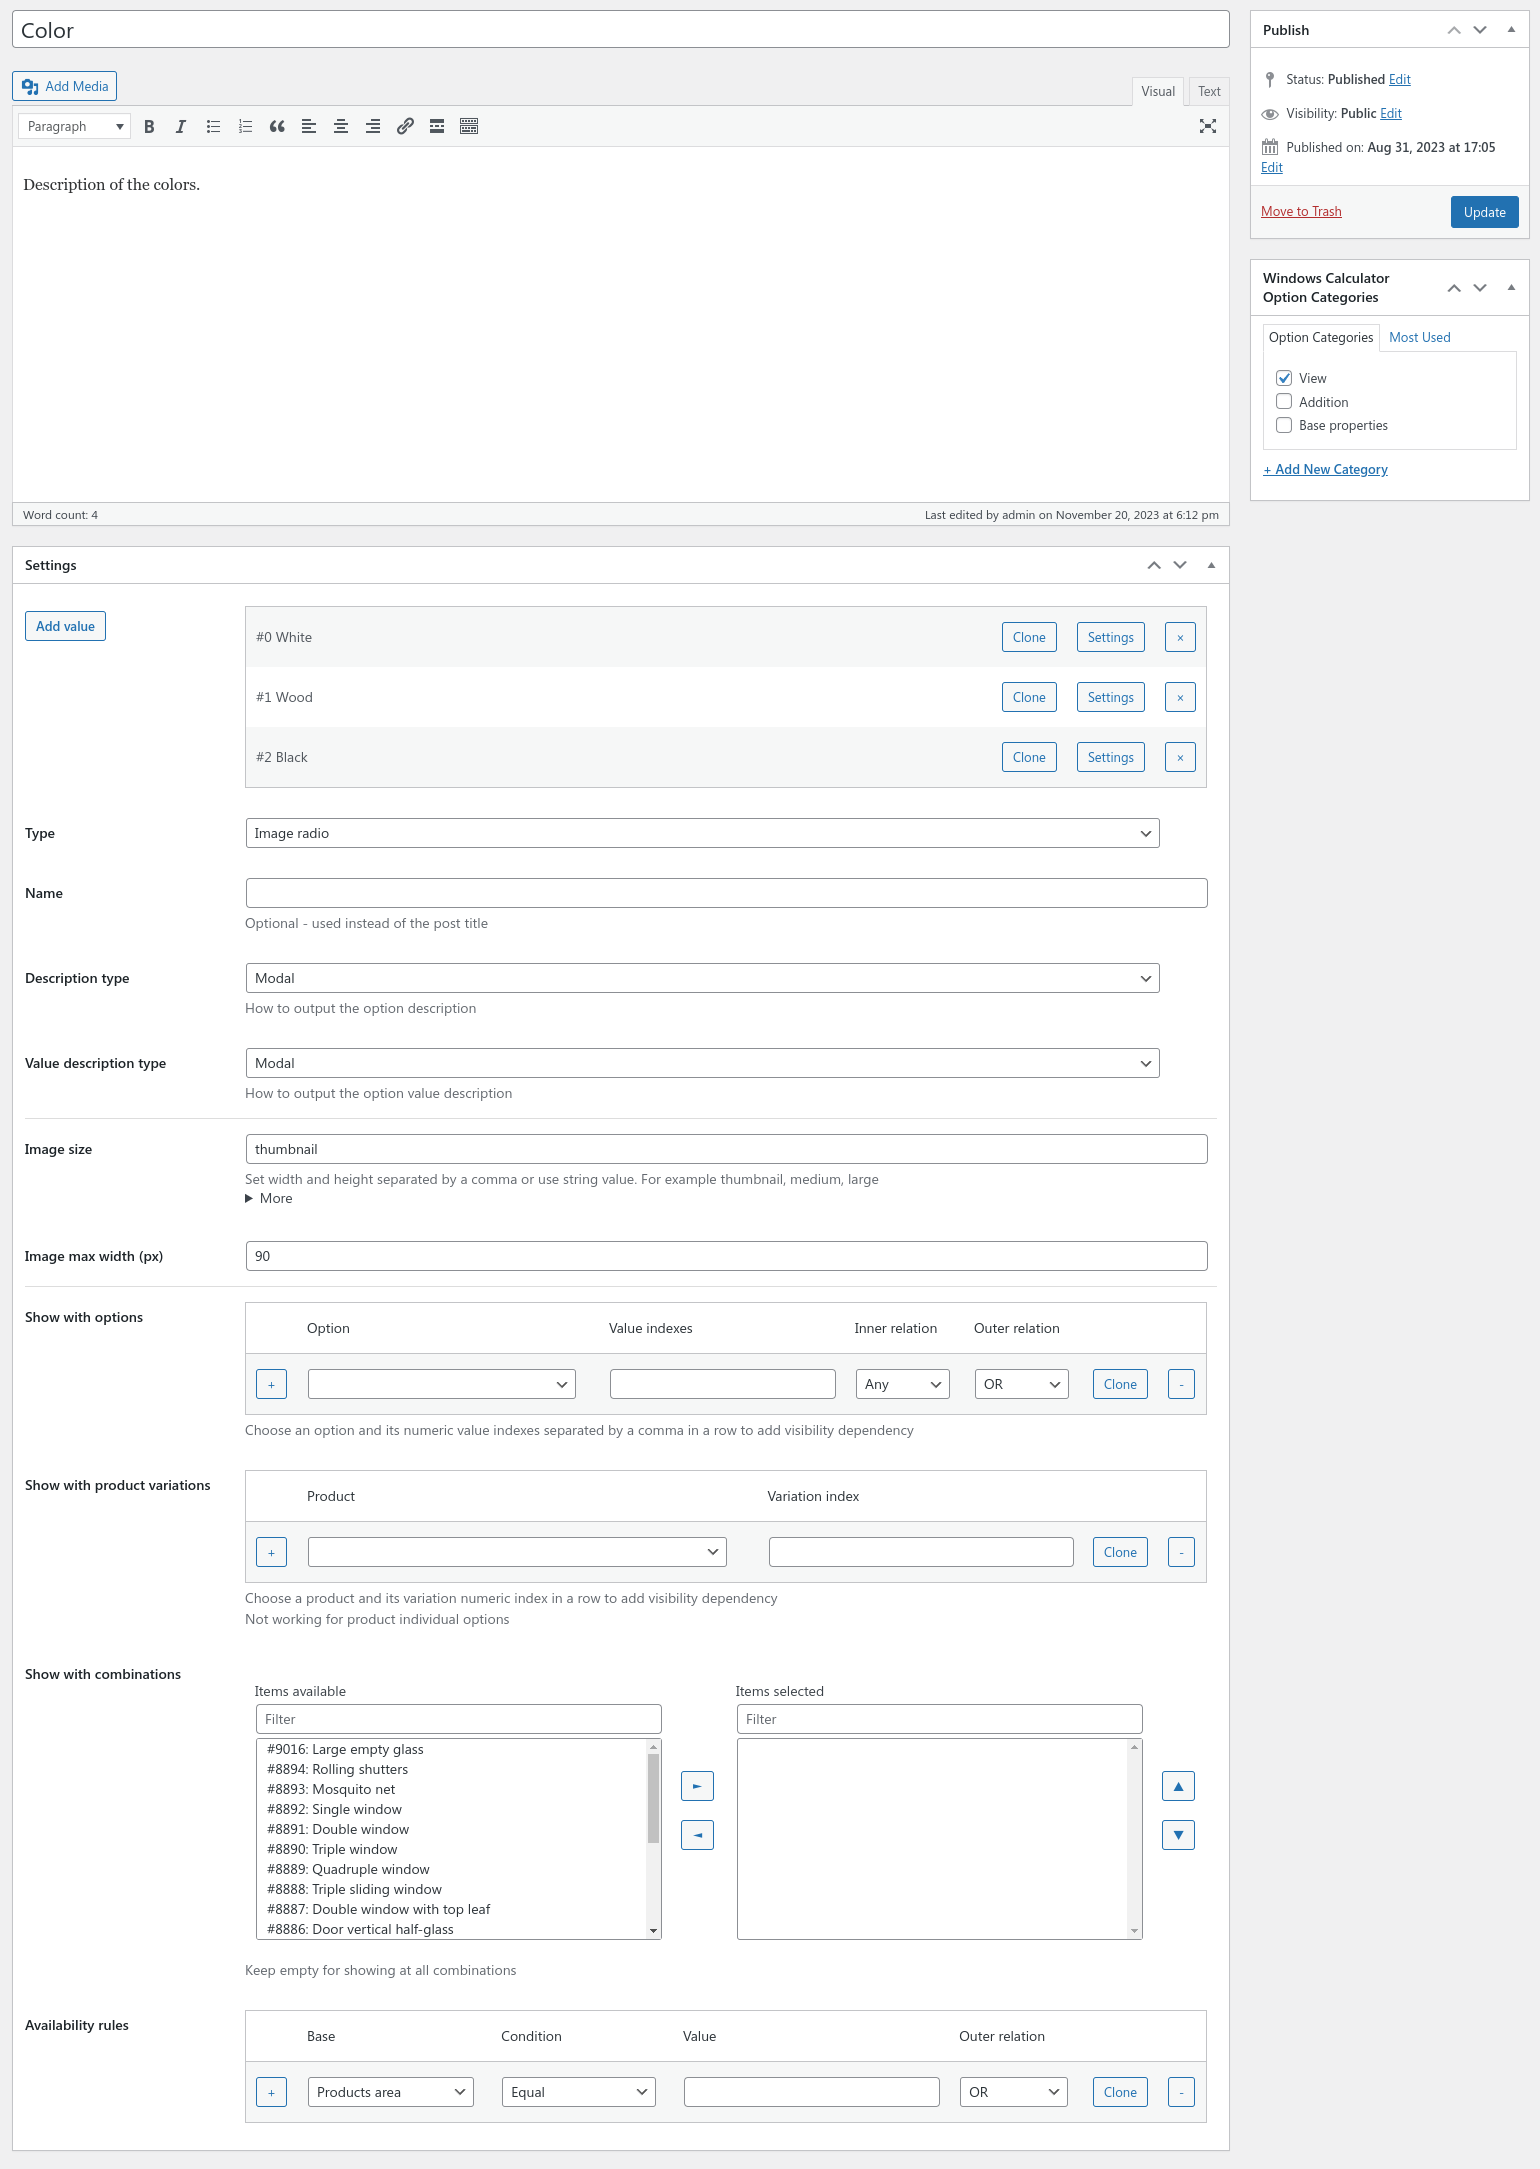
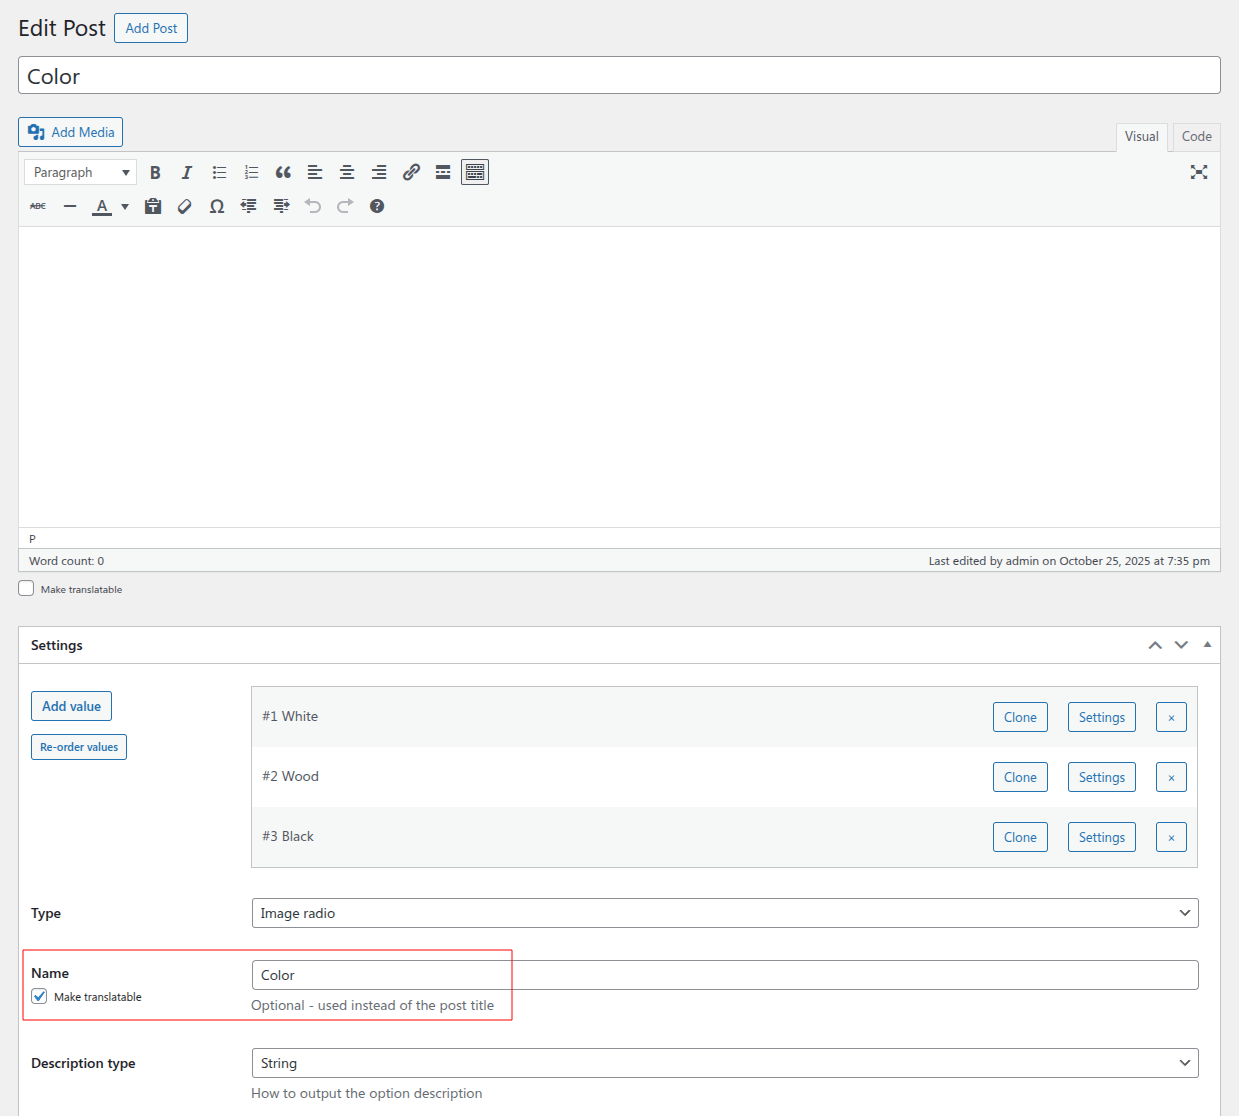
Values setting controls what values will be available to select for the option. Values indexes are incremented while adding new items. In case you need to sort the values and re-index them, click the «Re-order values» button once;
Value description type - select how to output a value description: in a tooltip, modal or inline;
Image size setting controls the size of the option value image output. It could be a numeric value of width and height separated by a comma, or string value of a registered image size;
Image max width setting limits the option value image output in pixels;
Enable image link setting to output a lightbox link to the large image.
Coupon submit/success/error text settings are used to control texts of a coupon setting;
Default value setting to output a default value for text types;
Min/Max settings are used to output the number type option.
Option value basic settingsOption value behavior settingsOption value advanced settings
There are also settings available for specific option types only:
Count input/unit/min/max are available for the checkbox and radio option types to output the quantity input field near the value;
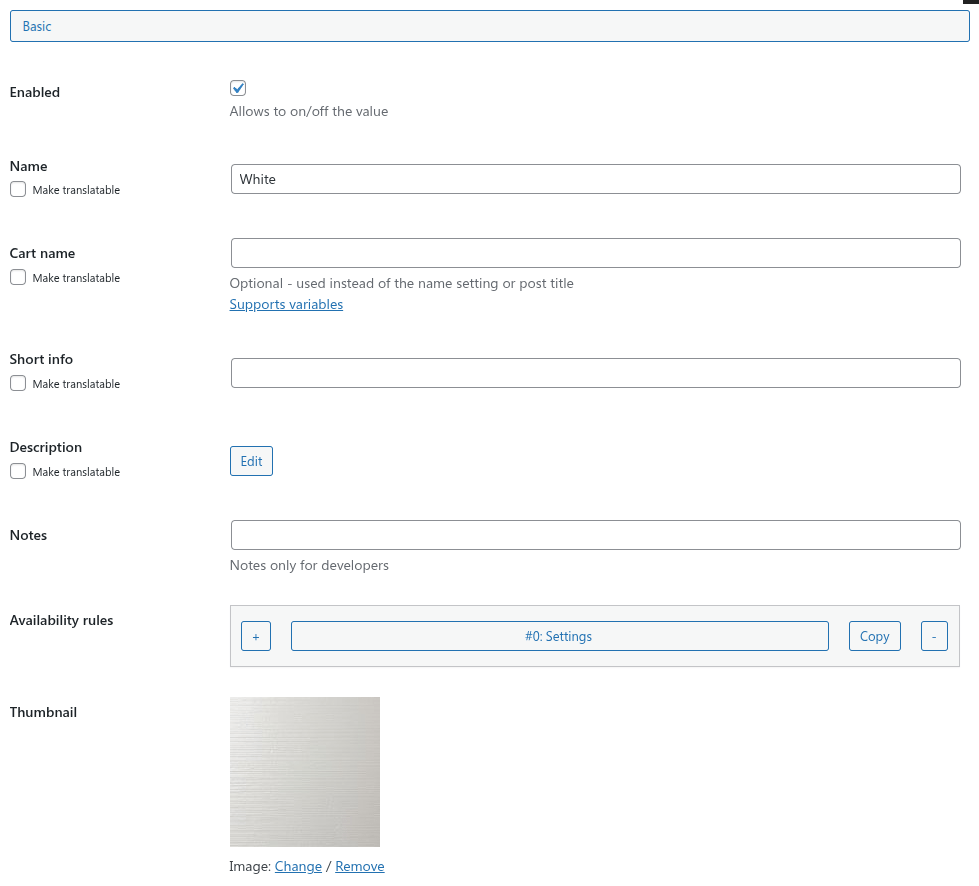
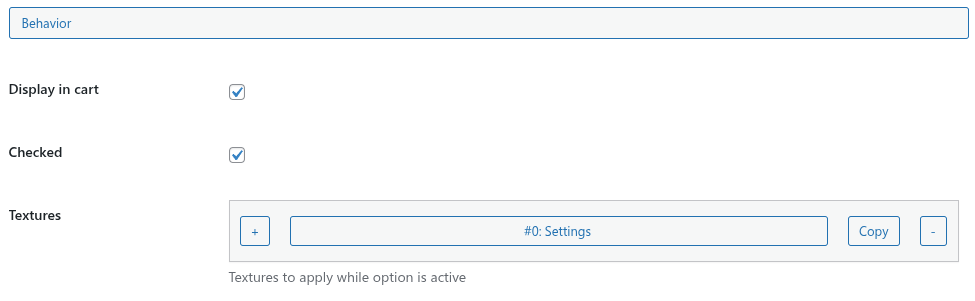
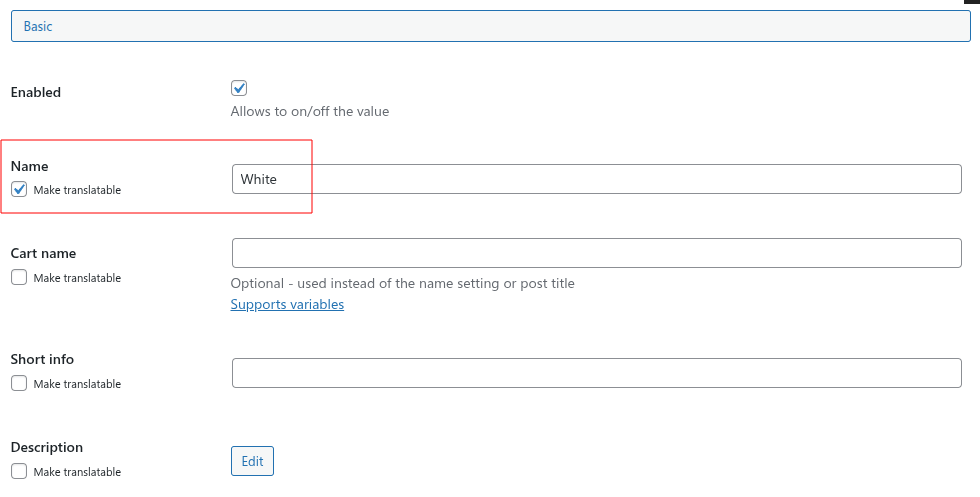
Checked setting allows to pre-select specific option value;
Thumbnail setting is available for the image-based option types to output an appropriate image for the option value;
Textures settings allow adding textures above the combination or products while the option value is selected;
Apply CSS setting adds defined CSS rules to the page with the calculator while the
option value is selected.
There is a special :wincalc-product-hash pseudo-selector supported to select only current product while applying CSS by an individual product option. It will be automatically replaced by :is([data-hash="..."], [data-product="..."]) to determine only specific product by its unique hash string.
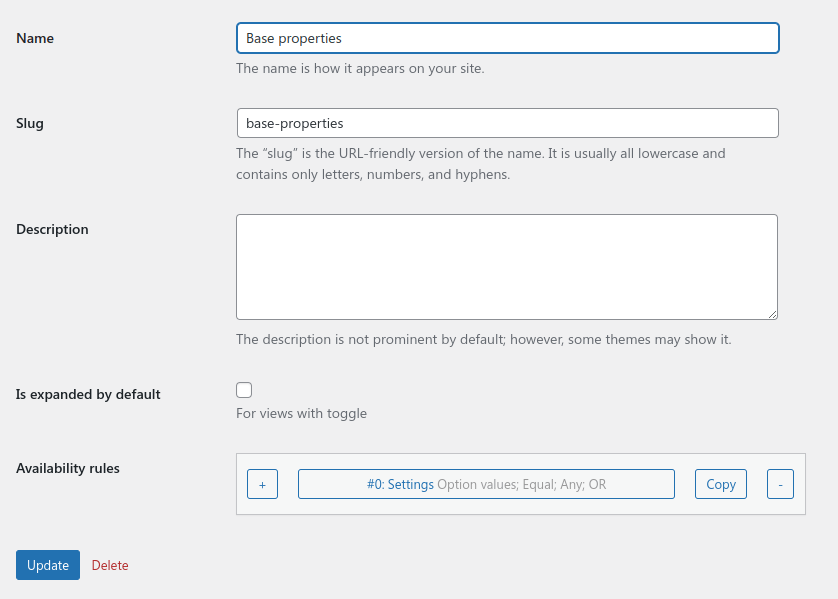
Option Category Settings
Each option category have just a few main options:
Is expanded by default setting is to output the category expanded if option can be toggled.
Option category settings page
Calculator Settings
After all previous steps done, you can create a calculator post.
Basic Settings
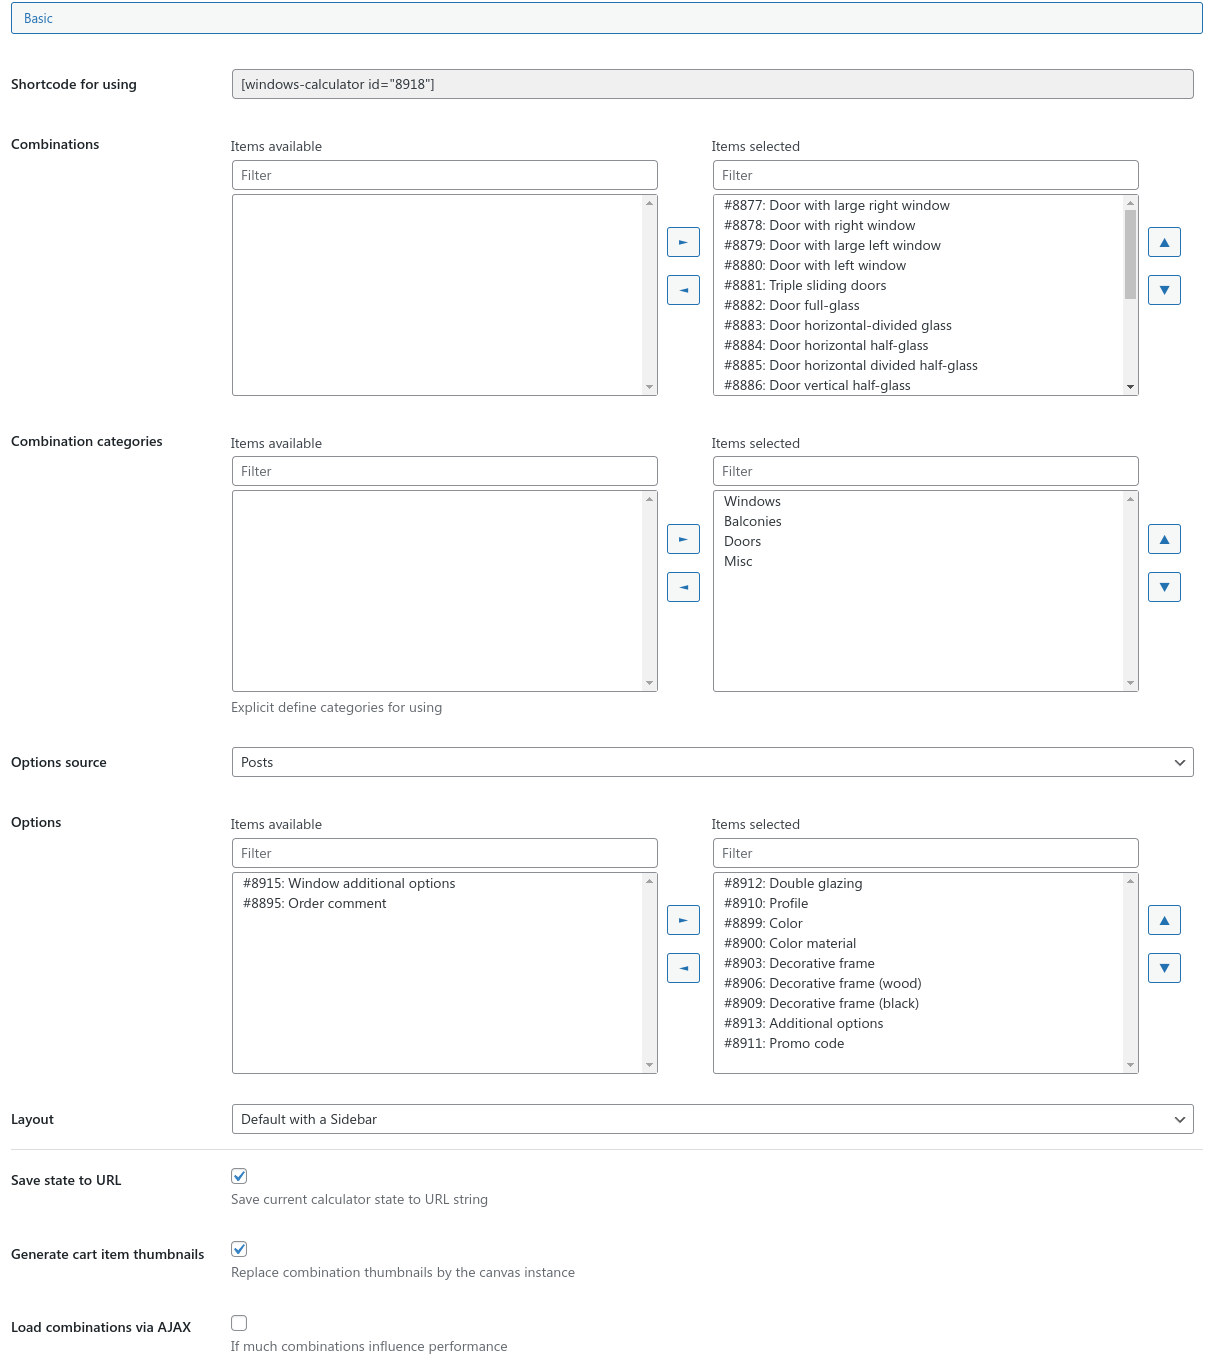
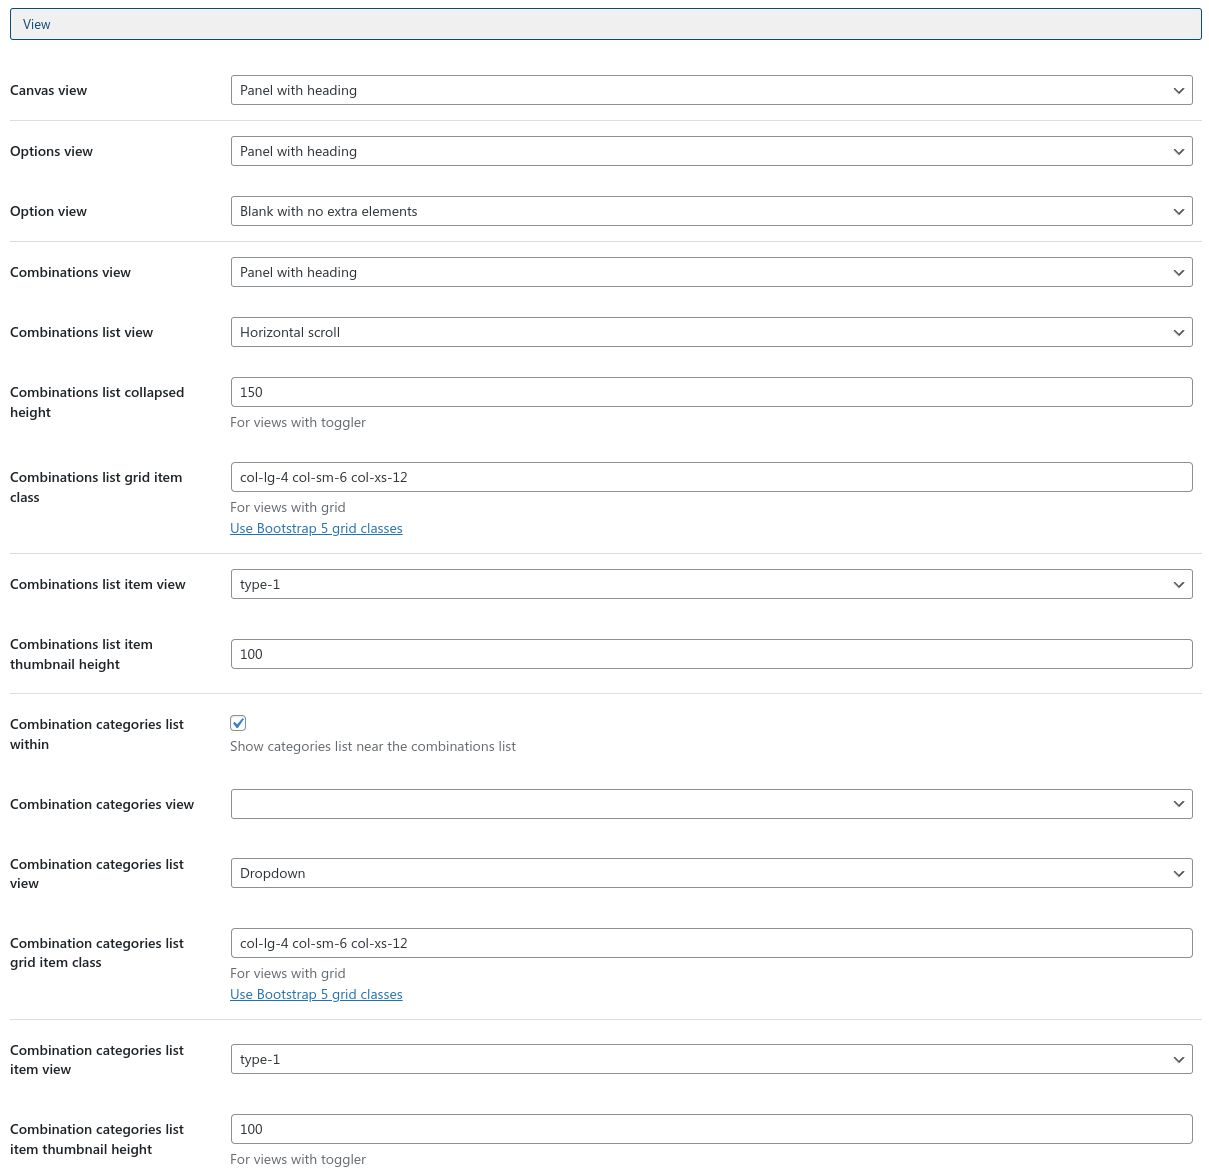
There are two ways to create a calculator layout. First one is using the native layout and setting called Default with a Sidebar and Layout template settings. There are a few built-in layout parts available, such as combination categories section, combinations section, canvas, current user selection preview, main controls bar, cart section, and steps section. Keep in mind, it's assumed there is only one cart element available for the calculator.
You can fill the Steps setting to define which sections will be available as steps.
Select the combination categories for use in this calculator and set their order. That's necessary to have at least one category to be selected to output combinations. That's always possible to hide the selector for the only combination using the Combination categories view setting.
Also, all added options and their categories are available for output as layout elements. So you can combine the desired combination view and workflow.
Options order
Then you're using option categories for a calculator, these options might be ordered not as you wanted to have them.
To solve it easily use any 3rd-party plugin for posts sorting, for example,
Simple Custom Post Order.
Another way is to build a calculator using a 3rd-party visual editor.
Visual editors supported: Elementor, WPBakery, Divi Builder.
All calculator modules are available for these editors.
Calculator basic settings
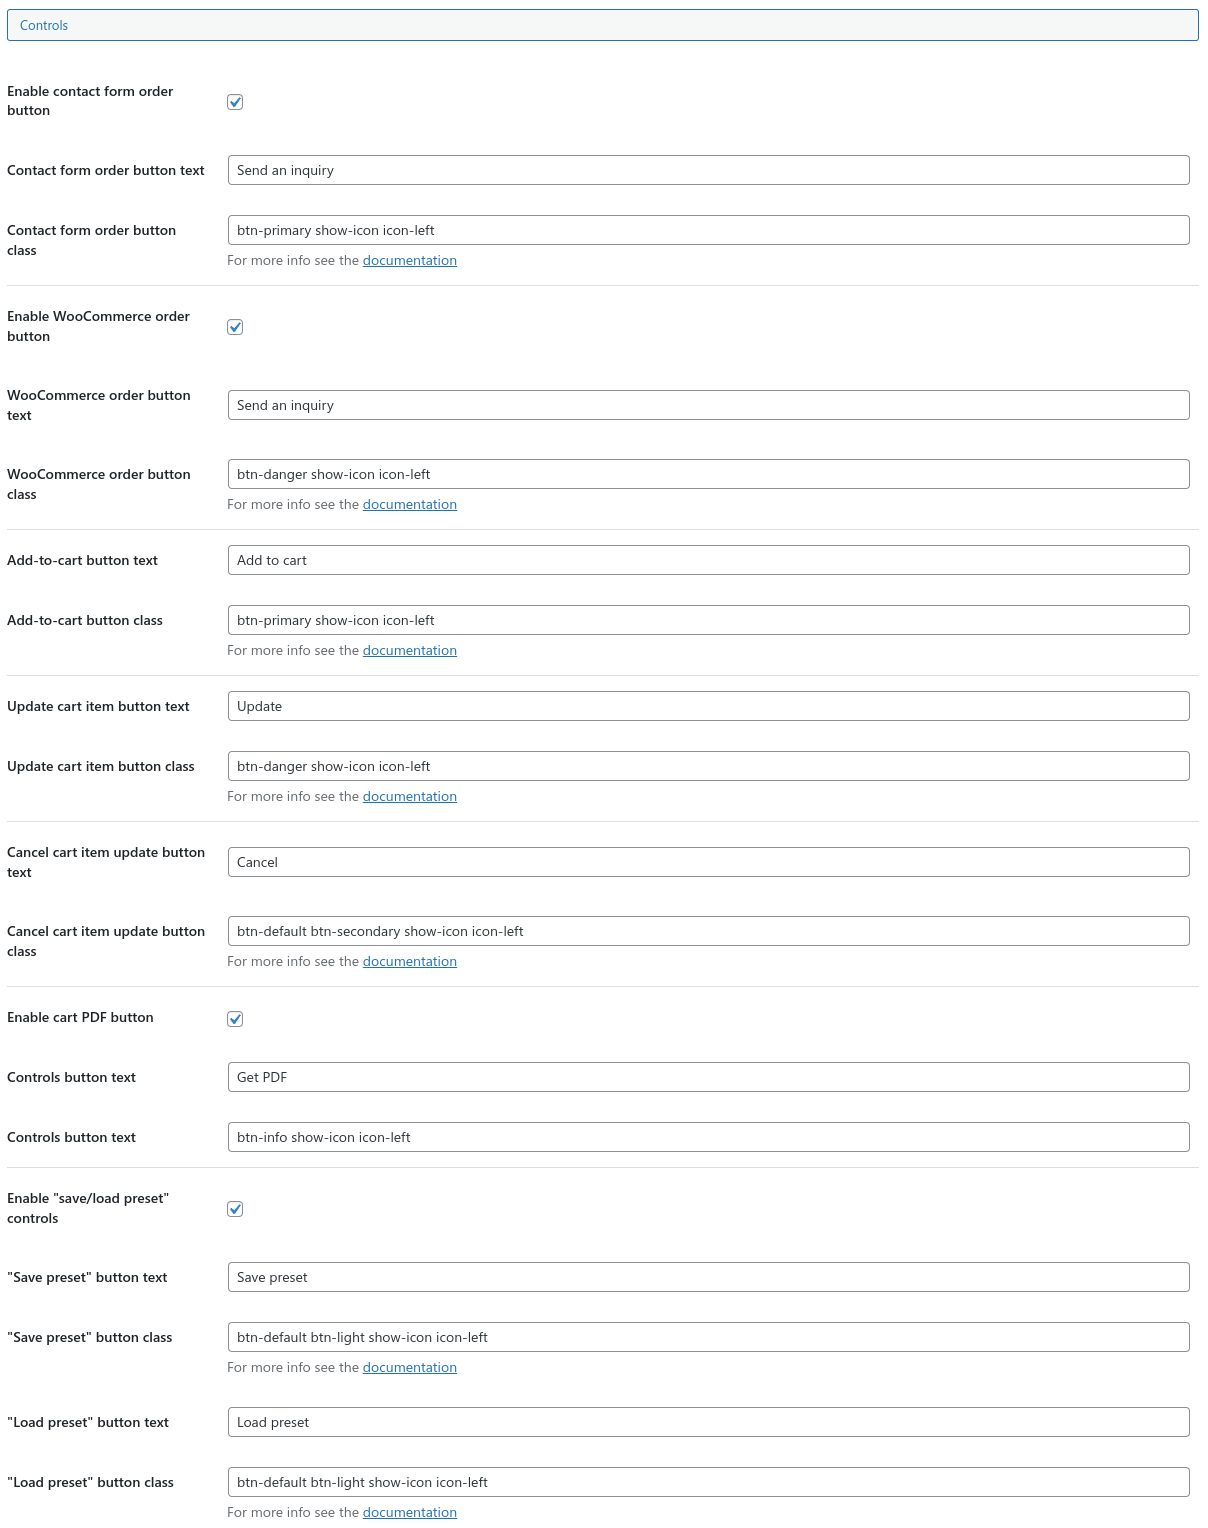
Behavior Settings
Loading type setting controls the method of calculator loading process. It helps to boost page performance if necessary. Available modes are:
Default - the entire calculator section will be available when you open the page;
Lazy initialization - calculator section will be empty when you open the page and will be loaded asynchronously;
Lazy canvas - calculator section will have all elements except of the active combination canvas;
Lazy initialization and canvas - calculator section will be empty when you open the page and will be loaded asynchronously. After active combination canvas will be loaded.
Save state to URL setting will allocate the current URL arguments according the current calculator options and values. After page refresh, all settings will be applied again.
Generate cart item thumbnails setting replaces the cart item's thumbnails with the active
canvas image.
SVG image notes
To have the best product presentation use the default SVG files from the plugin as a basement.
They are organized to be well rubber-scaled with the dynamic canvas type and to generate the cart item thumbnail correctly.
You can modify them for your needs and required using this Special SVG Tool. It allows changing image parts and properties, but keep it to be rubber and not distorting while scaling.
If you have really many of different combinations, and it slows down the performance, then tick the
Load combinations via AJAX option.
By default, product cart is enabled. However, this is possible to disable it to not store the selections and complete the order immediately with the current calculator selection.
Scrolling top gap option allows to change the top space left after scrolling the screen up on different workflow actions.
Calculator behavior settings
Controls settings
All calculator buttons can have different classes for their styling.
As the main plugin styles are based on the Bootstrap 5 framework you can use any from the
available styling classes of buttons.
Also, there are a few classes to control buttons text and icons appearing:
hide-text - hides text of the button but keeps it for screen readers;
hide-text-on-mobile - hides text of the button on small screens but keeps it for screen readers;
icon-start - define on which side of the button the icon should appear;
icon-end - define on which side of the button the icon should appear;
show-icon - always shows a pre-defined button icon. Requires icon-start/end class for work;
show-icon-on-mobile - shows a pre-defined button icon on small screens. Requires icon-start/end class for work;
show-until-first-step - shows control until can move steps backward;
show-until-last-step - shows control until can move steps forward;
hide-until-first-step - hides control until can move steps backward;
hide-until-last-step - hides control until can move steps forward.
There is also a possibility to add preset controls to the calculator. This setting will output two buttons to save the current calculator selection to a file and load it from this file.
Another feature is adding a control to save or load cart presets into the logged-in user. Alternatively, that button will not be visible.
If you are going to get the orders through email, then select one of the existing Contact Form 7 forms in
the Order contact form setting.
This is possible to clear the cart then the contact form is sent or keep it.
To get the order info as a string, add the [wincalc-order] shortcode
into the Message body field.
WooCommerce order redirect setting leads the customer to the cart, checkout or whatever page after the WooCommerce add to cart action.
Controls settings
View Settings
There are a lot of view settings for the most calculator's parts. There are no limitations, so you can combine them as you want to have the appropriate view.
With the Steps navigation walk type setting you can make unavailable going further through the steps if there is an unselected radio input, or keep it free-walk.
The Sticky main content/sidebar/controls offset tune the gap between the edge of the screen and the sticky element for different screen sizes.
That's possible to select stuck controls/cart controls placement - top or bottom of the page.
Using the Sidebar position setting you can control sidebar place for different screen sizes.
With the Sidebar width setting that's possible to change the sidebar width for different screen sizes. It uses CSS variables with a unit. Without a unit, the value will be converted to pixels.
Combination categories view setting allows to output category selector within or outside the combinations section, or hide it at all.
The Combinations grid item width option works grid-based templates of combinations. Define a column width in percentage or using another CSS unit for each specific screen size.
Calculator view settings
Pricing Settings
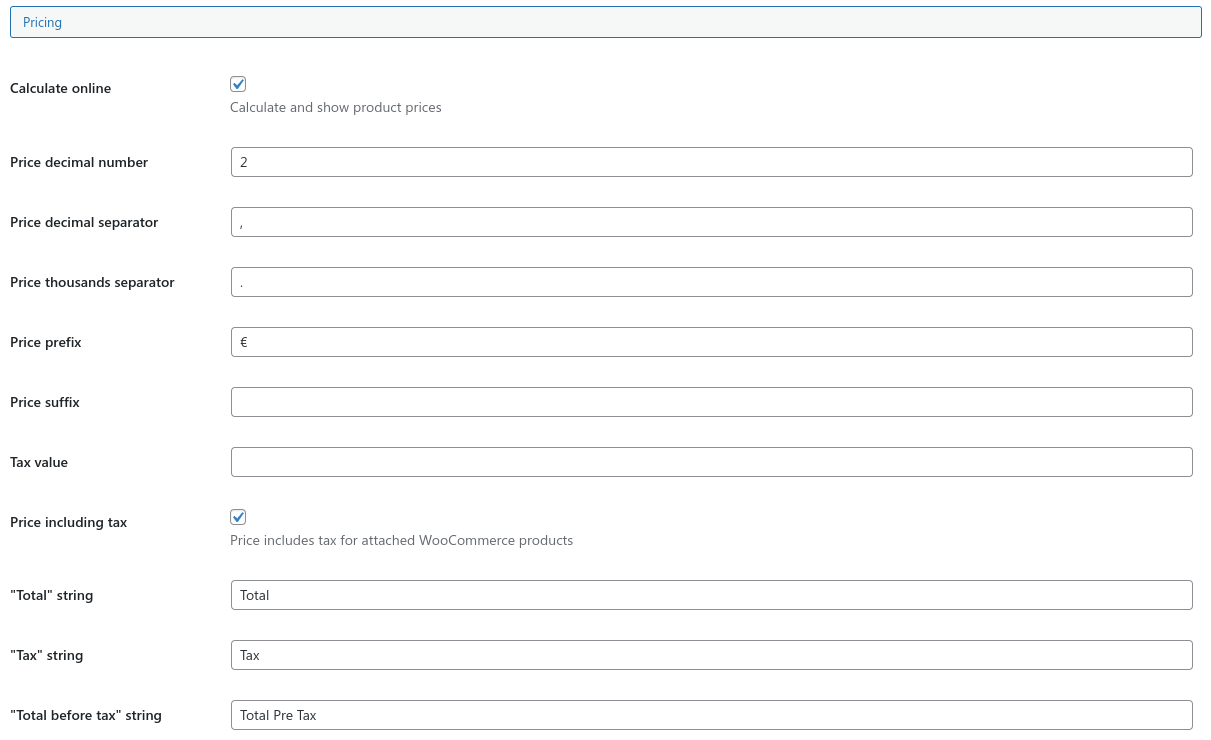
Output product prices option controls product item price appearance in the cart and PDF.
Define the required price currency and format using the special settings.
Set the Formula variables for the calculator level. They will be applied initially.
Calculator pricing settings
The important setting is Total rows. It allows storing any final totals calculations, like taxes or discounts.
First of all, that's necessary to define a row name to output. Also, it's needed a formula to get the required value. That can be a single variable or some calculation.
For example, that's possible to use [total_price] variable as subtotal, output [total_price] * 0.1 as 10% tax, and [total_price] * 1.1 as total + 10% tax.
There is a special Price element available for the Controls setting. You can select which rows should be visible using that element.
That's possible to define which row will be used as a final cart item price. If no rows are marked, the last one will be used.
That's also possible to define which row will be used as a final WooCommerce cart item price. That could be helpful, for example, if you want to output a tax within the calculator, but there is the same tax applied on the WooCommerce level. If no rows are marked, the last one will be used.
Each line have Availability rules setting to control its output. It's assumed at least one row is available for the calculator.
Calculator totals row settings
PDF Settings
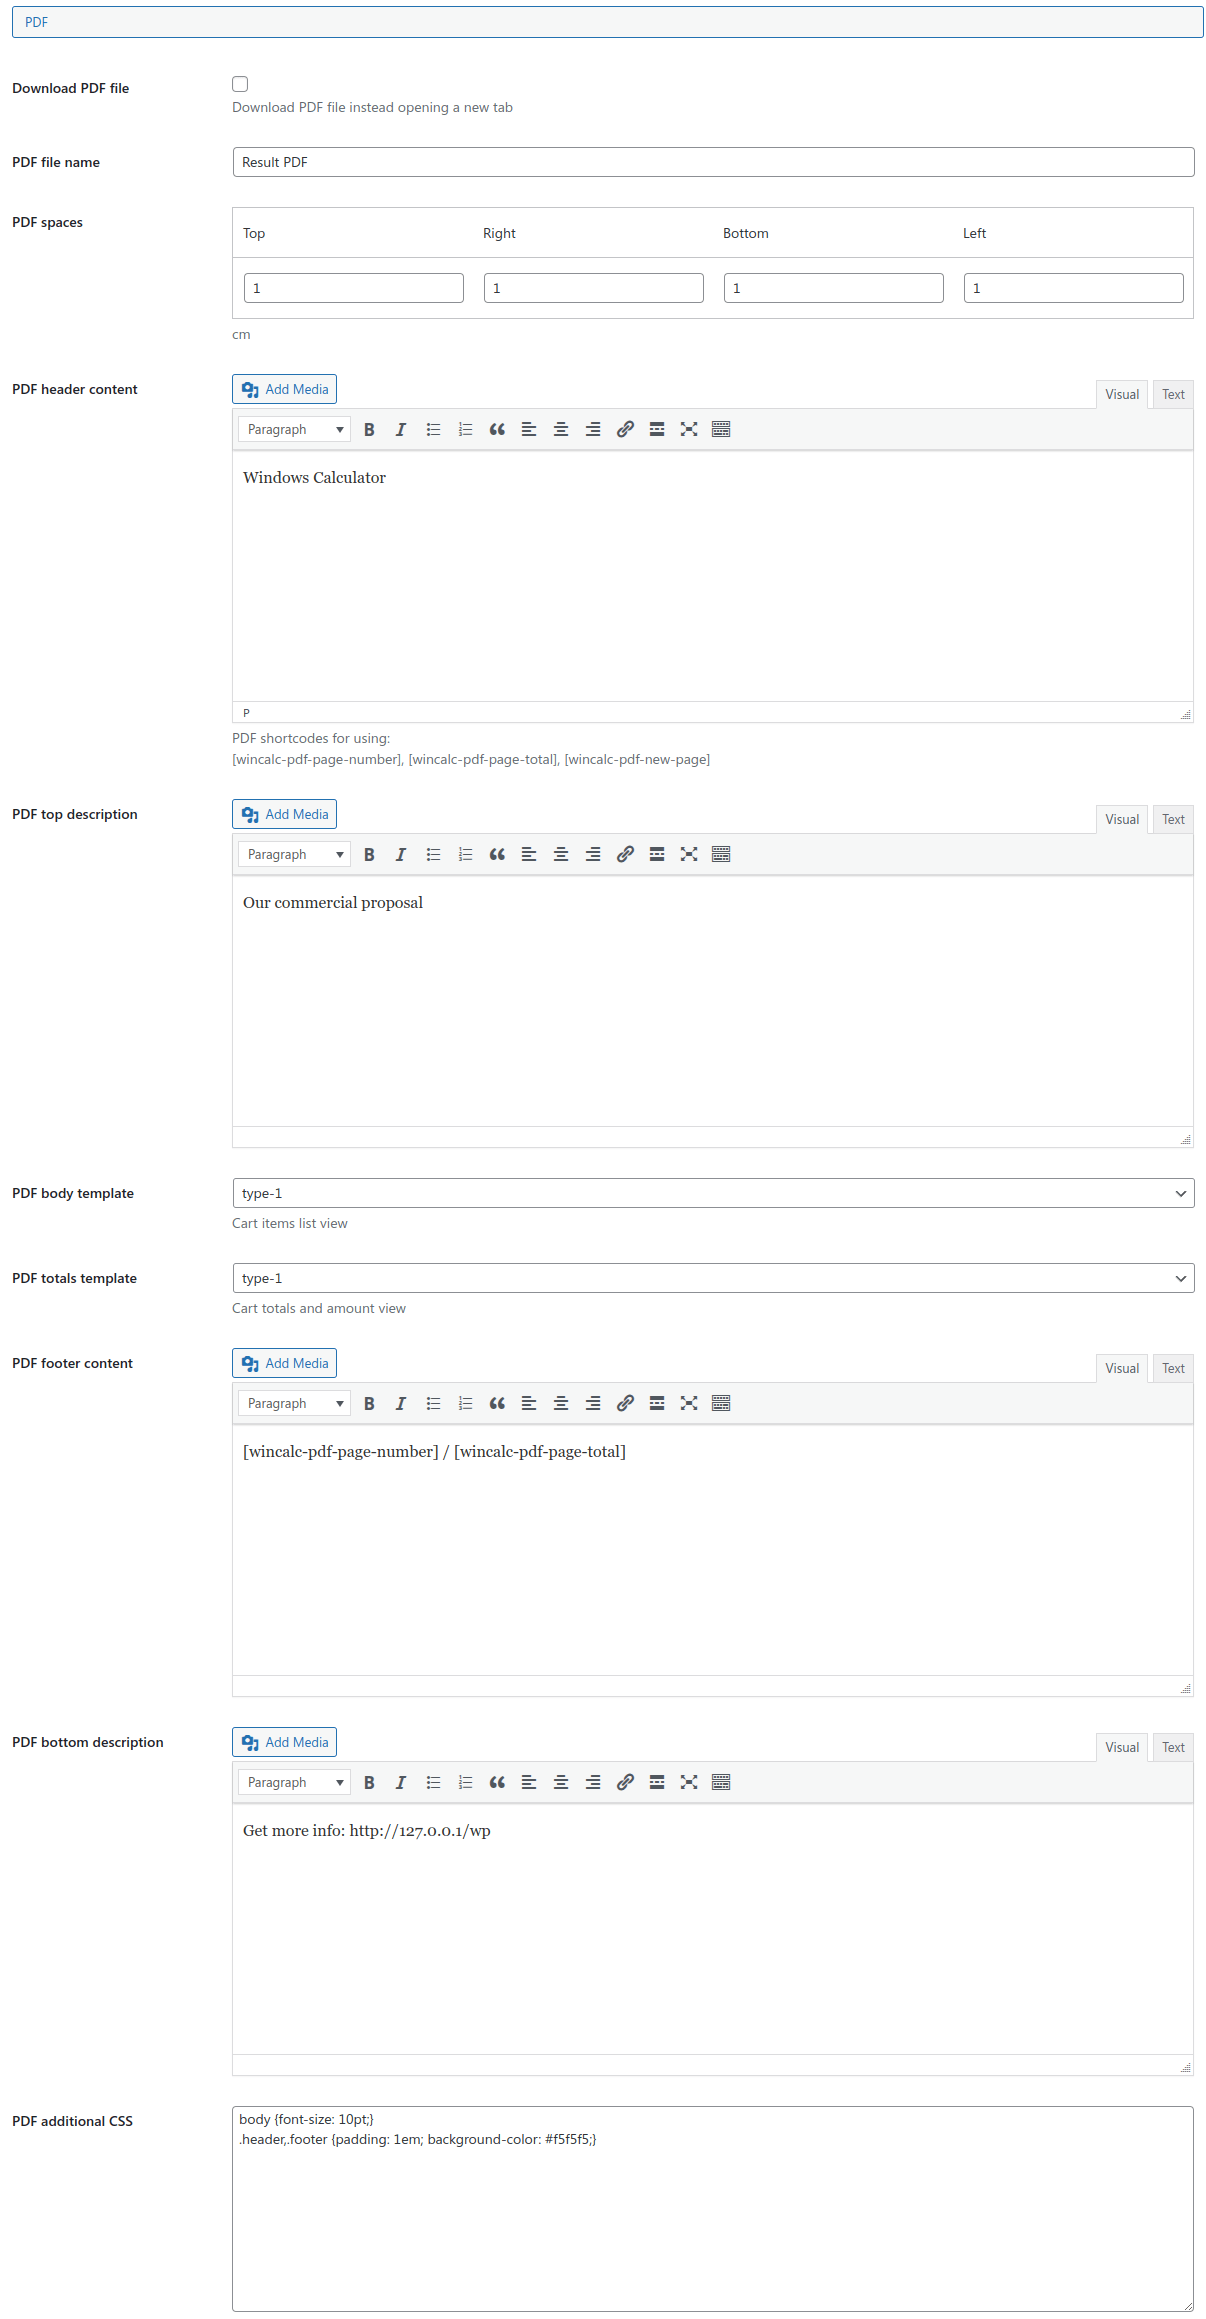
«Enable PDF» button to have possibility to open the PDF file. It will show all current cart content if it's enabled or only current selection if the cart is off.
Lower, you can find the most page parts settings to adjust.
Set required PDF page spaces for each side. As PDF header and footer are stuck to each page, be sure there is enough of space left top and bottom to insert header and footer there and not to overlap other page content. For example, if your header have a few lines of content and takes about 2cm of height, set the top PDF space at least to 2-3cm.
There are a few PDF body templates available to provide a required products table view. You can customize these views or create new ones. These views are located under order/pdf/body.
There are a few PDF totals templates available to provide a required totals section view. You can customize these views or create new ones. These views are located under order/pdf/totals.
Moreover, you can pass extra CSS to the PDF file using the special setting.
This is possible to output Contact Form 7 field values while sending the email with an attached PDF.
To do so use the same field shortcodes from the Contact Form "Mail" tab, for example: [your-name], [your-email].
Initially PDFs have is-default class around the elements, while as
PDFs sent via a Contact Form 7 have the is-contact-form-7 class instead.
So this is possible to hide contact form fields using such extra CSS:
                                .show-for-cf7 {display: none}


                                .is-contact-form-7 .show-for-cf7 {display: block}
And the field example:
<span class="show-for-cf7">Client name: [your-name]</span>
Calculator PDF settings
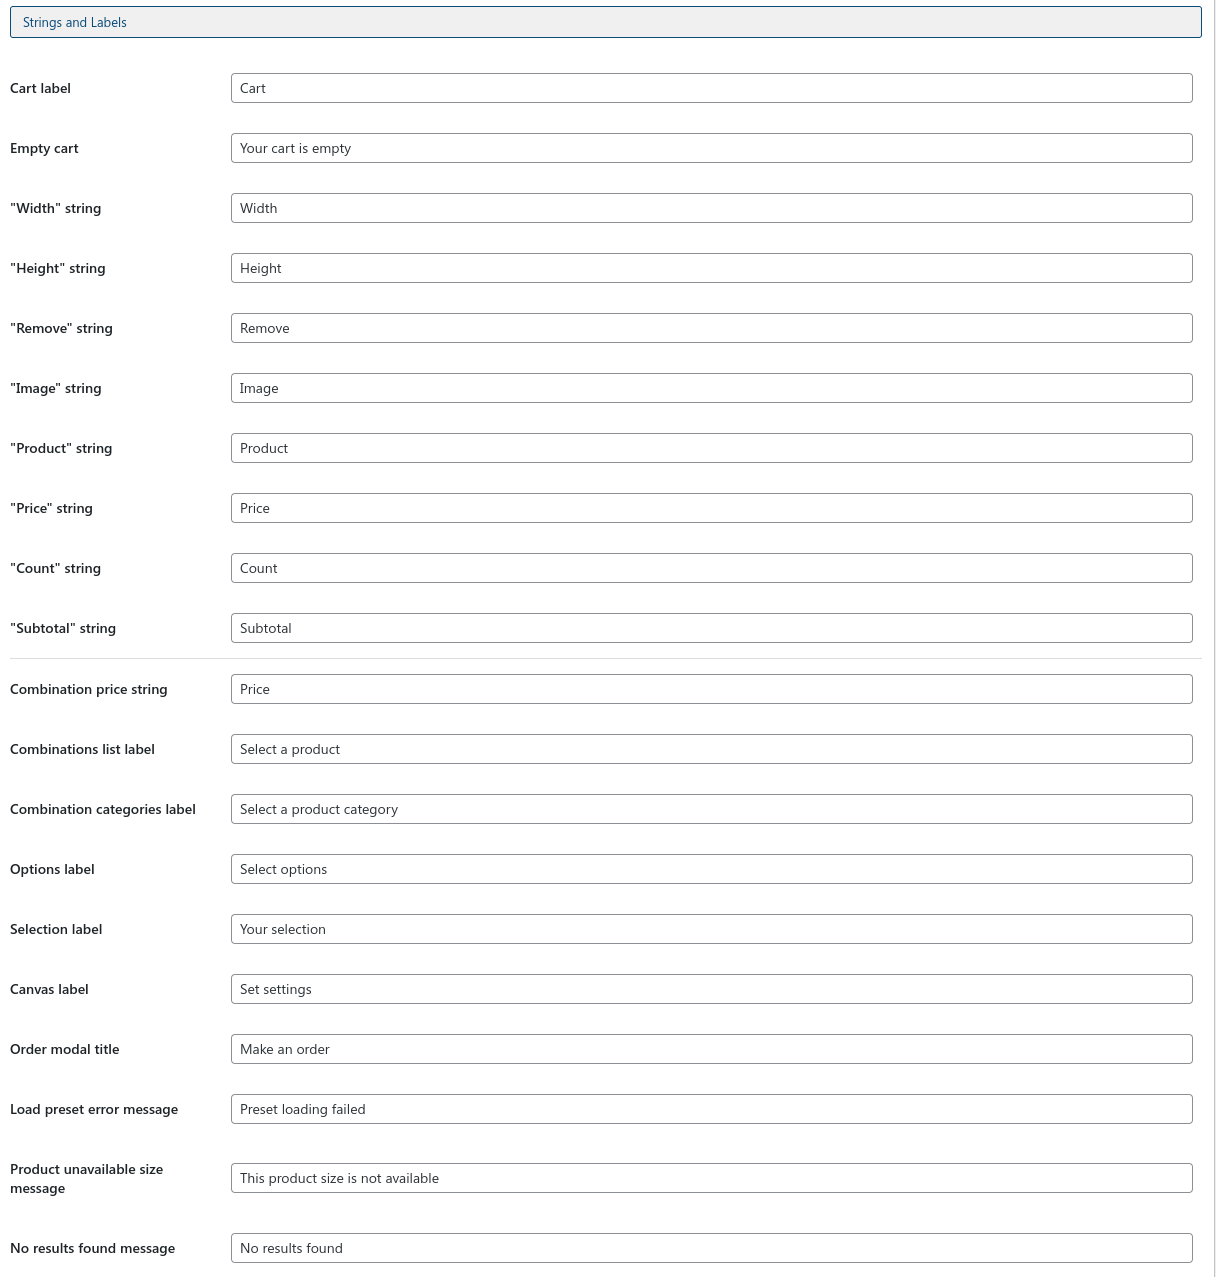
Strings and Labels Settings
This is possible to change all static text parts of the calculator output.
Calculator strings settings
Export to HTML
That's possible to use the calculator as a ready-to-use HTML output. That might be helpful in case you have not a WordPress site. To do that set all desired calculator settings and save them. Its static HTML will be prepared from the actual settings.
To keep the asynchronous operations, as adding product to cart or loading combinations via AJAX, workable, that's necessary to keep WordPress installation in any server's directory to have a URL to connection with the plugin API. All these request will call WordPress AJAX functionality.
There is the AJAX URL setting to define the exact URL to the admin-ajax.php file, which handles AJAX-requests. Its value is pre-set by default and should indicate the correct URL to the file, however, you can change it if necessary. But keep this setting as is in case you're using the calculator via WordPress site, cause it influence this work also.
Formula variables to CSS variables setting allows to convert any formula variable into a CSS variable.
Example: Formula variable: my_profile_size; CSS variables: --my-profile-size.
For formula variable my_profile_size = 50 CSS variable will be --my-profile-size: 50;
This is possible to convert any number of formula variables to CSS ones.
Calculator advanced settings
Availability rules
Availability rules setting
Availability rules is a complex setting to control conditional logic for any calculator entity appearance depending on the current state.
The number of rule rows is unlimited.
To define a rule, click the relevant button. In the modal window that appears, select the Source to apply the rule.
The source could be: active option values, active product variations, active combination, active combination category, or equation to compare two formula variables.
If rules allows selecting a few values, with the Relation within the items option, if you select AND value then the entity will be visible only if the items you defined in this rule are all met.
If you select OR option, then the entity will be visible if even any of the items you define here is met.
Option values source
That's possible to select an option and its specific values to be active to fulfill the rule.
Availability rule by option value
Product variation source
That's also possible to select a product and its specific variations to be active to fulfill the rule.
Availability rule by product variables
Combinations source
The rule can be met only if a specific combination is currently active.
Availability rule by combination
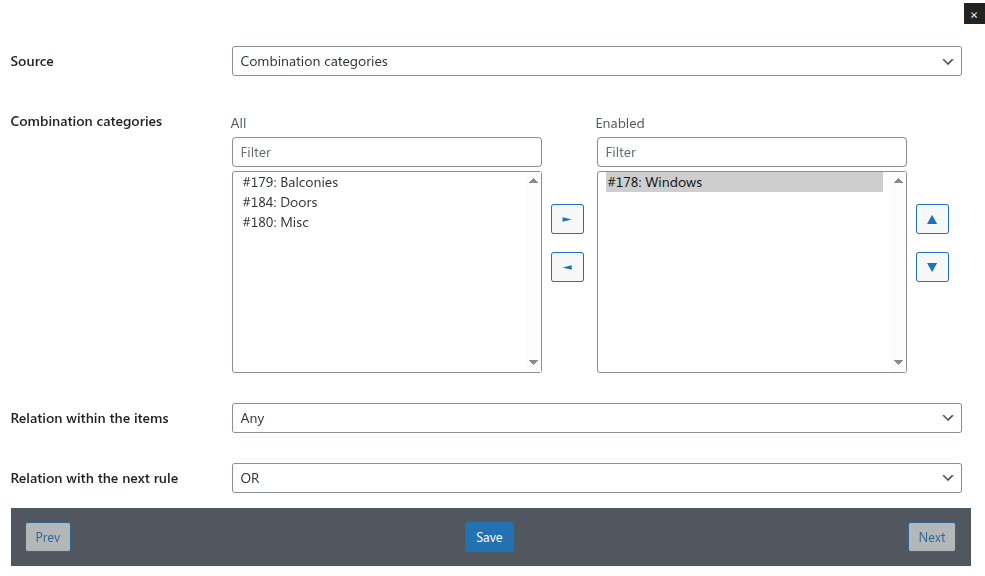
Combination categories source
The rule can be met only if a specific combination category is currently active.
Availability rule by combination categories
Equation source
With the equation source that's possible to check math result of any variables values or comparing.
Equation returns "false" if its result equals zero. All other results mean "true". Comparing operators always return "1" or "0". That makes it possible to create AND/OR chains.
For example, ([smallest_product_width] > 1000) * ([smallest_product_height] > 1000) means smallest product width is larger than 1000 AND smallest product height is larger than 1000.
Another example, ([smallest_product_width] > 1000) + ([smallest_product_height] > 1000) means smallest product width is larger than 1000 OR smallest product height is larger than 1000.
You can use any of supported variables or your custom ones to fill the equation.
Recalculate formula variables option allows to re-calculate all variables before trying the equation to have the most actual values. If you're sure these variables are not changed meanwhile, then you can disable this option for better performance.
Availability rule by equation
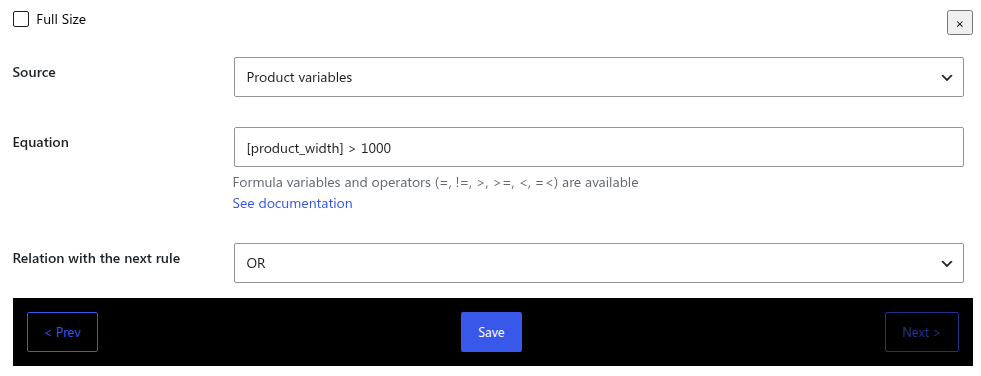
Product variables
There is a special source to check only native product variables without re-calculating the whole stack. This source can give a big boost in case you make on/off entities in a single product context. For example, individual product options.
Equation returns "false" if its result equals zero. All other results mean "true". Comparing operators always return "1" or "0". That makes it possible to create AND/OR chains.
For example, ([product_width] > 1000) * ([product_height] > 1000) means product width is larger than 1000 AND product height is larger than 1000.
Another example, ([product_width] > 1000) + ([product_height] > 1000) means product width is larger than 1000 OR product height is larger than 1000.
The main plugin price calculation process is based on using of the native and custom variables. Each native variable have its own specify and use-case.
Native variables
Native variables are found from the active calculator state to be defined with their values before every calculation process.
Product variables
These variables are used only while calculation the specific product price.
This variable is used only while calculating specific product price of the combination. Its initial value is equal to the Common price setting value or price found in the Individual prices table according to the current product size. Combination's Pricing type setting defines which of these two settings is used.
That's possible to modify it only while the product price calculation. For example, this is possible to change or use it by individual product options.
It's rewritten for each product while calculation. After calculating the last product, this variable will be kept with the last calculated value;
[product_id] - indicates current product ID;
[product_index] - indicates current product index of combination;
[product_variations], [product_id_ID_variation], [product_index_INDEX_variation] - indicates current product variation index of combination;
[product_width], [product_id_ID_width], [product_index_INDEX_width] - indicates current product width for Individual pricing type;
[product_height], [product_id_ID_height], [product_index_INDEX_height] - indicates current product height for Individual pricing type.
Dynamic parts of these variables:
ID - indicates product ID in the database;
INDEX - indicates product index on the combination canvas.
Combination variables
These variables get their values from the current combination state and can be used for other calculations.
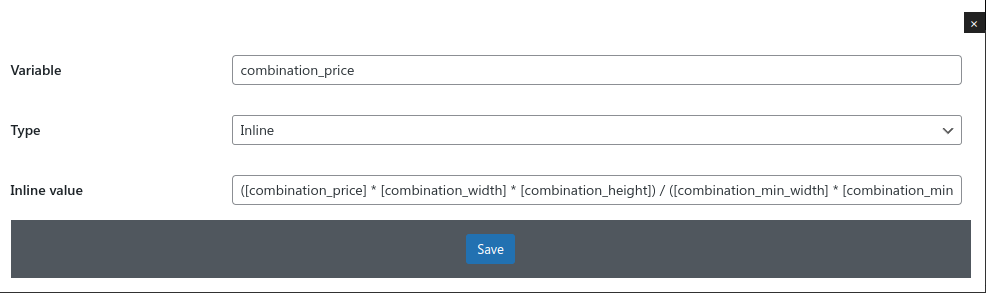
[combination_price] - Sums up the [product_price] variable value for each specific product;
[combination_width], [total_width] - indicates current combination width with the common pricing type;
[combination_height], [total_height] - indicates current combination height with the common pricing type;
[combination_min_width] - indicates minimum combination width with the common pricing type;
[combination_min_height] - indicates minimum combination width height the common pricing type;
[combination_max_width] - indicates maximum combination width with the common pricing type;
[combination_max_height] - indicates maximum combination width height the common pricing type;
[products_total_width], [total_width] - indicates all products total width;
[products_total_height], [total_height] - indicates all products total height;
[smallest_product_width] - indicates the smallest product width from the available;
[smallest_product_height] - indicates the smallest product height from the available;
[smallest_product_square] - indicates the smallest product square from the available;
[largest_product_width] - indicates the largest product width from the available;
[largest_product_height] - indicates the largest product height from the available;
[largest_product_square] - indicates the largest product square from the available;
[products_count] - number of products available for the combination;
[utility_id_ID], [utility_index_INDEX] - dynamic variables to indicate specific canvas utility value of the combination, such as slider or input.
[total_price] - initially gets the pure [combination_price] value. All other price modifiers should be applied to that variable. Can't be less than zero after all modifications.
Cart variables
Can be used if cart is on for your calculator. Initially all equal to zero.
[cart_count] - number of items in cart (including their quantity);
[cart_item_count] - item count value to be used while adding it into the cart;
[cart_lines] - number of item lines in cart (whatever their quantity is);
[cart_total] - current cart total price.
Option variables
These variables are updated and used only while applying the selected options modifications.
[option_count] - count input value if it's available for the checkbox type option (default value is 1);
[option_value] - selected option value. Can be used for calculation only if it's numeric.
Adding own variables and modifiers
All plugin entities have a setting to add or modify any variable. That's possible to define or override any number of variables by this setting. Just need to add a few rows to do that.
Formula variables settings
Each formula variables row must have a variable name to define or modify. There are a few types of variable types available.
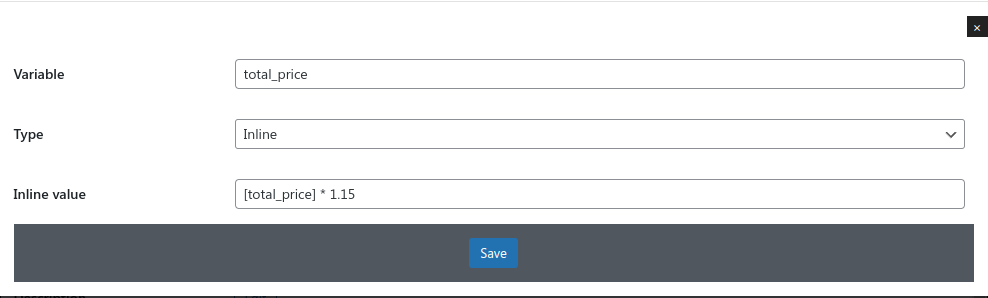
Inline type
Here is an example of simple inline variable modification. Namely, increasing the [total_price] variable by 15%. Note, what variable name setting have no square brackets around the variable name, while any value variable do.
Inline variables can store numbers or strings. String values should be rounded by quotes.
Inline variable example
Also, variable can have condition to be applied. Variable isn't added if condition result equals zero. All other values means met condition.
Examples:
[total_price] > 100: met if total_price variable is more than 100;
([total_price] > 100) * ([my_variable] = 'foo'): met if total_price variable is more than 100 AND custom my_variable is equal 'foo';
([total_price] > 100) + ([my_variable] = 'foo'): met if total_price variable is more than 100 OR custom my_variable is equal 'foo'.
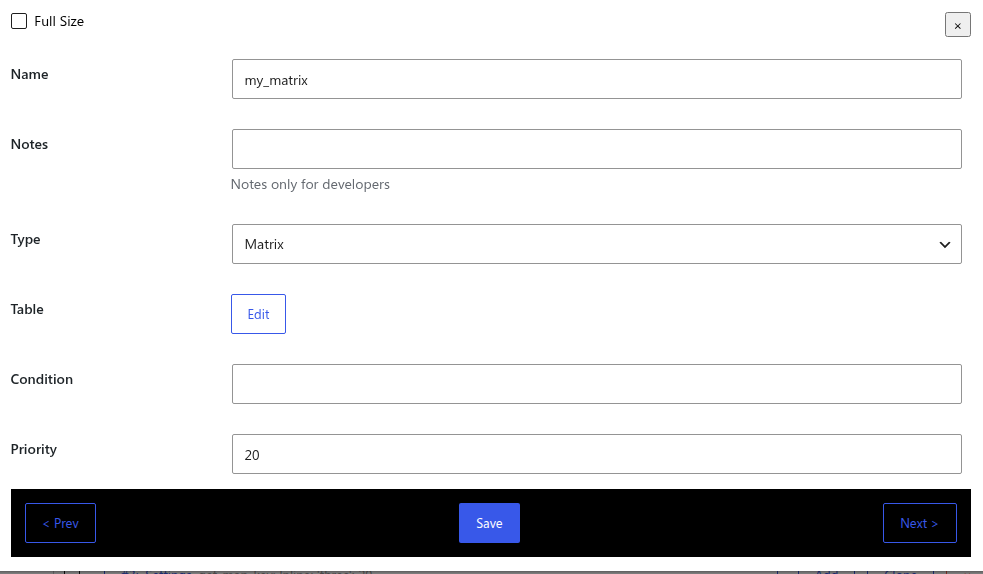
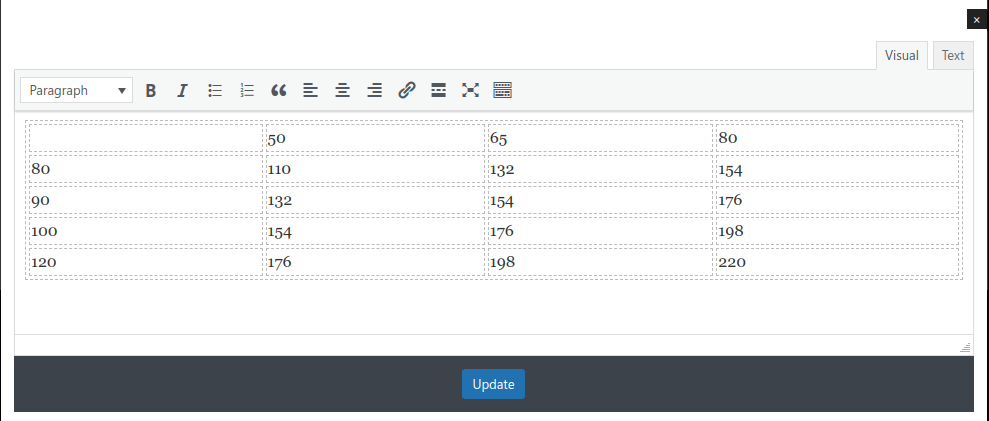
Matrix
«Matrix» variable type allows to store tables and find a value in cross two keys.
Matrix variable example
There is a visual editor under the «Edit» button:
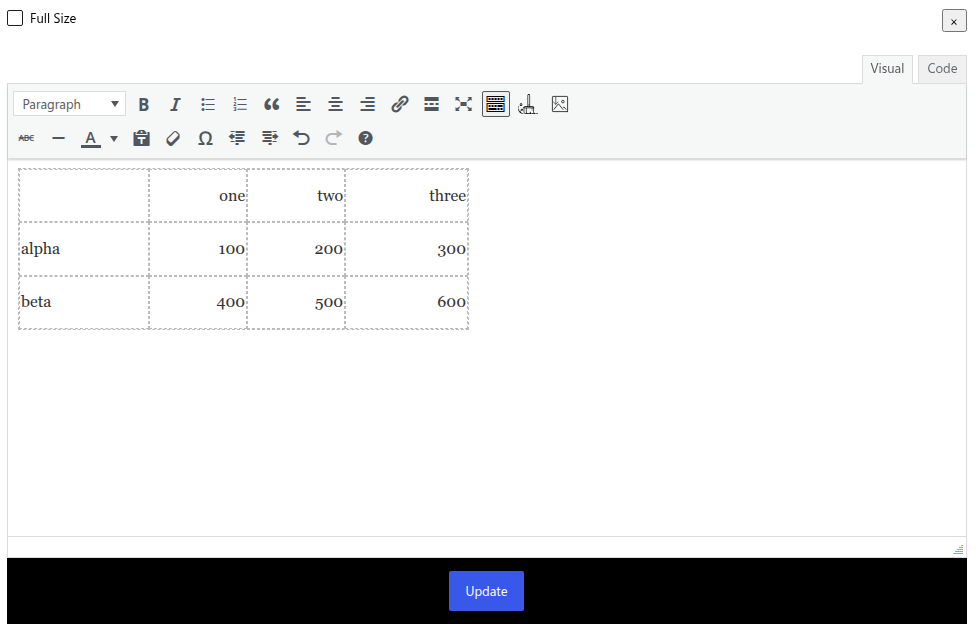
Matrix variable HTML example
The very first cell of the table is empty and isn't used. The first row is used as the first range of values, while as the first column is the second range of values. In cross of them are stored the returning values.
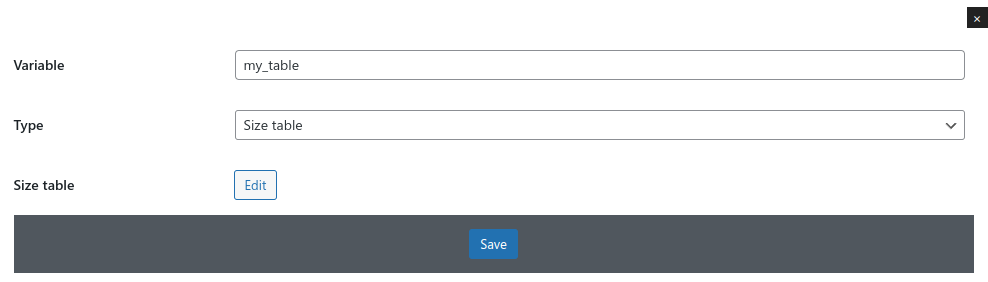
There is also the «Size table» variable type available. It allows defining a variable what will store a pricing table, similar to the product size one.
Table variable example
There is a visual editor under the «Edit» button:
Table variable HTML example
The very first cell of the table is empty and isn't used. The first row is used as the first range of values, while as the first column is the second range of values. In cross of them are stored the returning values.
What's the difference between the Matrix and Size table variable types?
Size table variable always works and returns number. It selects a value from the table according to the roundTo option. Namely, it looks for closest value by passed width and height. Also, it returns a Size Error notice if found cell have no value (even not have zero).
While as Matrix variable only trying to find a value by precise keys passed. Also, it returns a fallback value if required cell is not found.
The calculating of the formulas and variables have a pre-defined logic and few levels. Firstly, all variables storage get cleared from older data and values.
Default order of calculation is made of:
Updating all native variables, such as current sizes and cart state;
Adding custom variables and formulas of all active elements into the Main Calculation Stack which is made of:
Adding Calculator custom variables into the Main Calculation Stack;
Adding [combination_price] variable calculation into the Main Calculation Stack which is made of:
Cloning the Main Calculation Stack into the Product-Level Calculation Stack
Getting of the [product_price] variable - using of the simple product price for common pricing type, or finding price from the sizes table for individual pricing type;
Adding Product custom variables into the Product-Level Calculation Stack;
Adding Product Variation custom variables into the Product-Level Calculation Stack;
Adding Individual Product Options custom variables into the Product-Level Calculation Stack;
Calculating the Product-Level Calculation Stack for this product only;
Adding the final [product_price] to the [combination_price] variable;
Adding Combination custom variables into the Main Calculation Stack;
Passing [combination_price] into the [total_price] variable;
Adding Common Options custom variables into the Main Calculation Stack.
The main advantage of this approach is having all variables in the calculation stack while calculating the product price value, because combination price calculation is fired after filling the main stack.
Example
To make it more clear, let's explore an example:
Variables calculation example
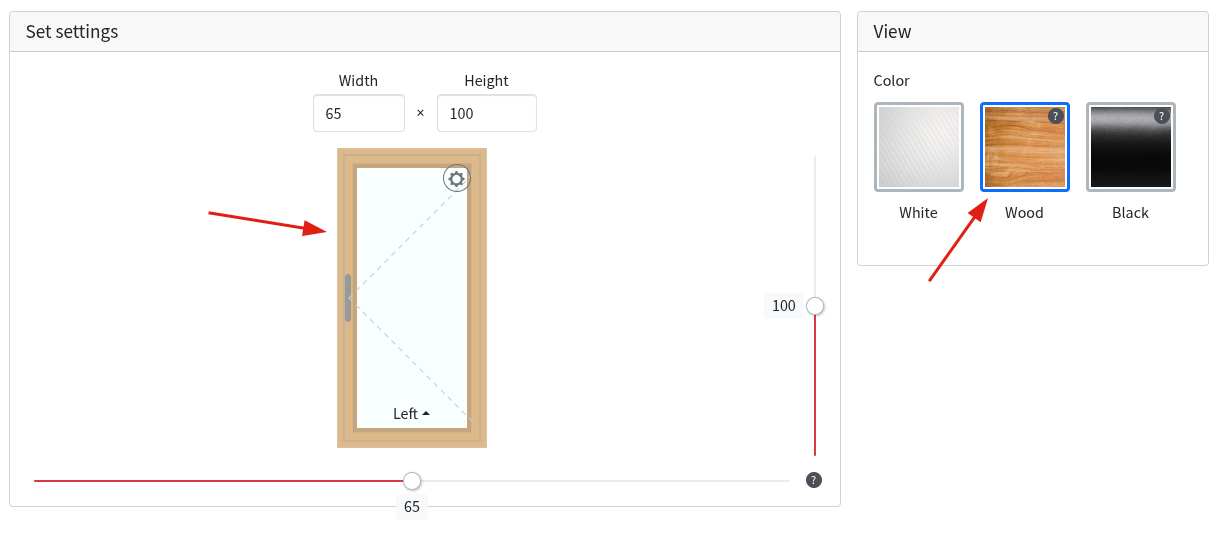
Let's assume this product variation size 65x100 is found in the size table and have price equal to 100.
Imagine this product have such custom formula to modify the product price variable using an actual product perimeter and a custom color_price_modifier variable.
While as "Color" option values have such custom variables:
White: color_price_modifier = 0
Wood: color_price_modifier = 1.2
Black: color_price_modifier = 1.5
During the calculating combination price, after cloning of the Main Calculation Stack with all common option values added ("Color - Wood" for our example) into the Product-Level Calculation Stack it will look like:
color_price_modifier = 1.2 - got from "Wood" value of "Color" option;
For our example, there will be such calculation stack:
product_price = [product_price] + (7 * (2 * ([product_width] + [product_height]))) - will throw and error cause [product_price] variable isn't defined yet, so will do nothing;
product_price = 100 - found in the sizes table.
That way the product price will be kept the same while calculating the combination price. How to change the order of these formulas to calculate it differently?
For that case is needed to change the Priority setting of the custom variable formula. Initially, all formulas in the stack have 20 priority. With the setting you can hoist or lower down the formula. A value less than 20 will be calculated earlier, while as value greater than 20 will be calculated later.
For our example only need to change "Color" option values priority to 21 or higher if necessary. That way the calculation stack will look like this:
Using this feature you can create a very flexible calculation process.
Debugging variables and formulas
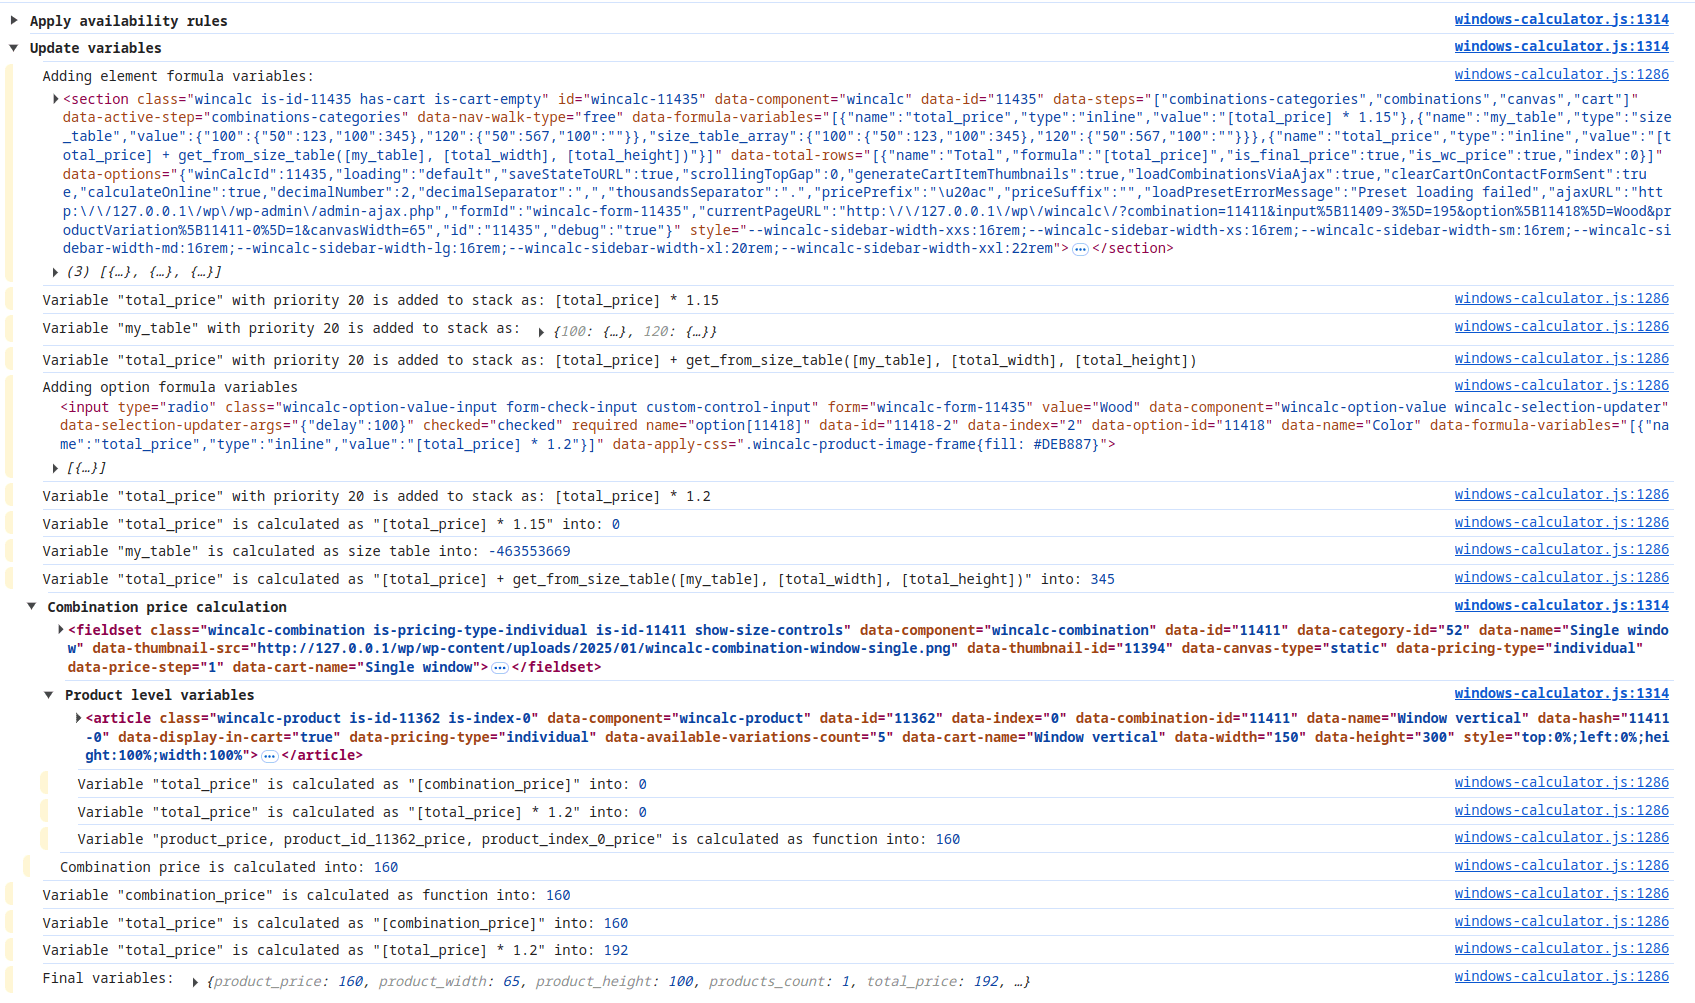
In case you'd want to see how the calculation process goes, add the debug="true" attribute into the windows-calculator shortcode. Calculator will output all applied availability rules and the process of calculating the variables into the browser console.
Variables calculation in console
Functions
This is also possible to use special functions while calculating a variable result.
Matrix variable
When a matrix variable is defined, use a special get_from_matrix function to find an appropriate value by two different inputs. Here how it looks like:
fallback - value to return if key isn't found (default 0).
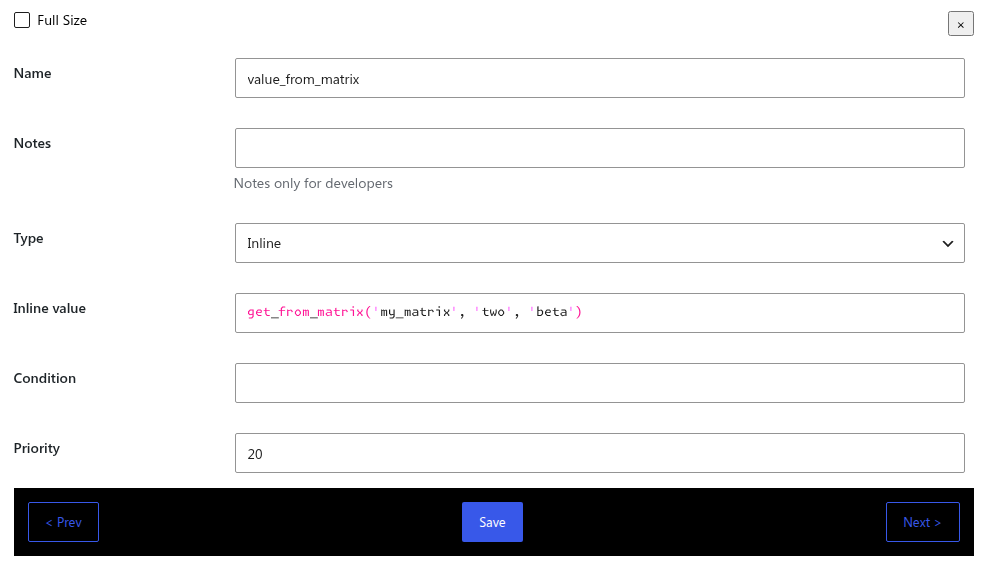
Here is an example of defining the [value_from_matrix] by a value found in the [my_matrix] variable using column key 'two' and row key 'beta'.
That's also possible to use variables instead of key string. Matrix name can be passed as 'string' or [variable] cause it doesn't matter.
Matrix variable usage example
Size table variables
When a size table variable is defined, use a special get_from_size_table function to find an appropriate value by two different inputs. Here how it looks like:
roundTo - the way to round intermediate value. Possible values are:
0 - middle rounding between the near sizes (default value);
1 - round to the upper closest value;
-1 - round to the lower closest value;
Here is an example of increasing the [total_price] variable by a value found in the [my_table] variable using the [total_width] and [total_height] native variables.
That's also possible to use strings instead of width and height variables. Table name can be passed as 'string' or [variable] cause it doesn't matter.
Table variable usage example
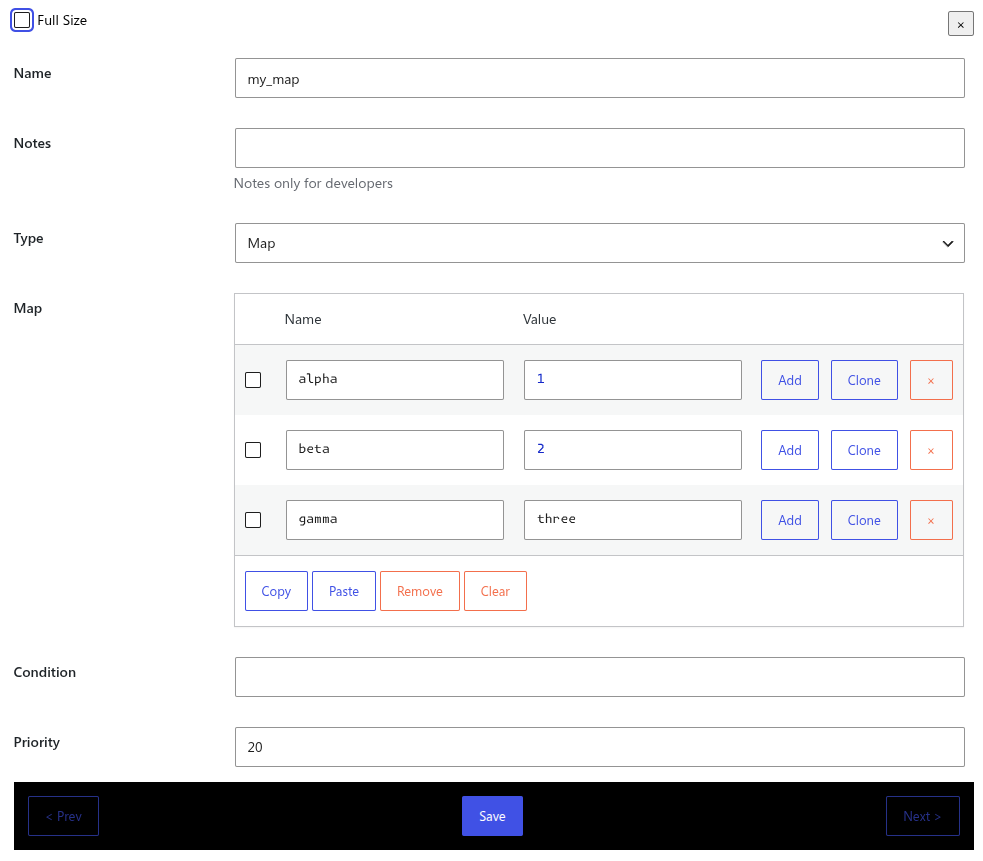
Map variable
When a map variable is defined, use a special get_from_map function to find an appropriate value a key:
get_from_map: (map, key, fallback = 0)
map - map variable to work with;
key - key to find in the map;
fallback - value to return if key isn't found (default 0).
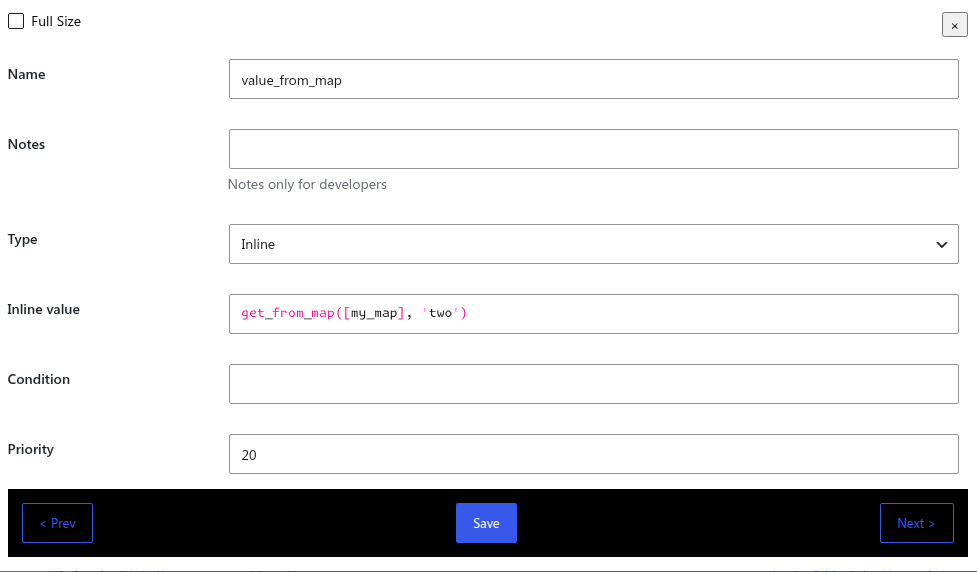
Here is an example of defining the [value_from_map] by a value found in the [my_map] variable using key 'two'.
Use any of them as sin(3.14) if that's a functions, or as PI or E if it's a constant.
Variables spreadsheets
Download
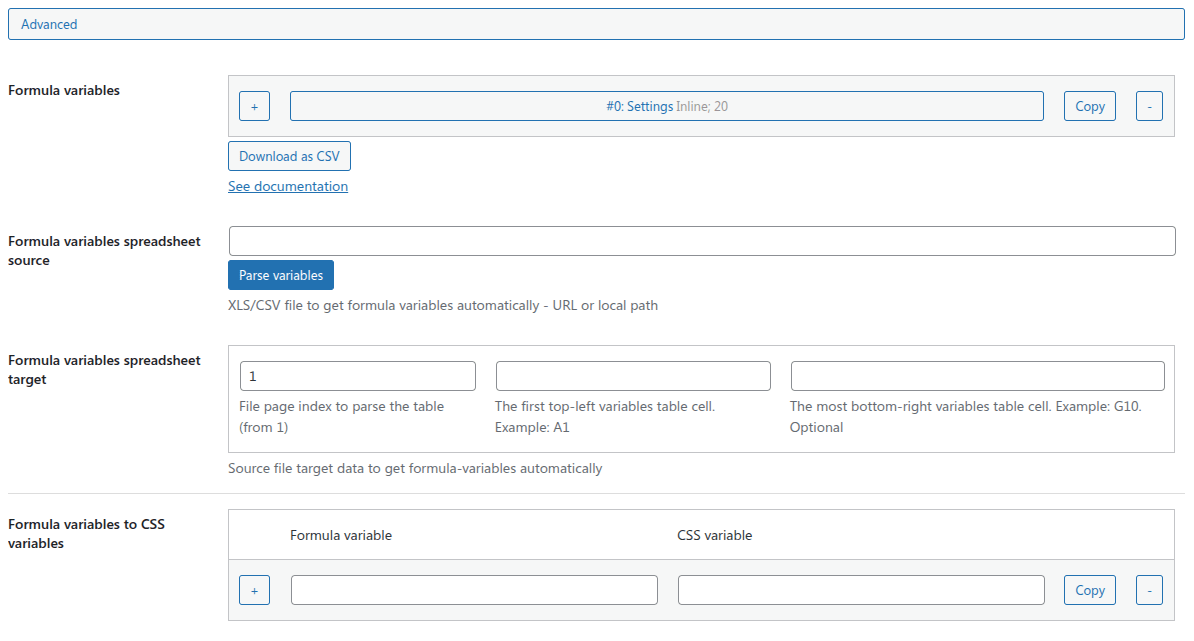
This is possible to Download as CSV all variables list. The file will have specific columns order and markup to be able for import later.
Fill the variables and save the post. Then you can download these variables as a file. First row with column names is auto-added and needed for correct file import after.
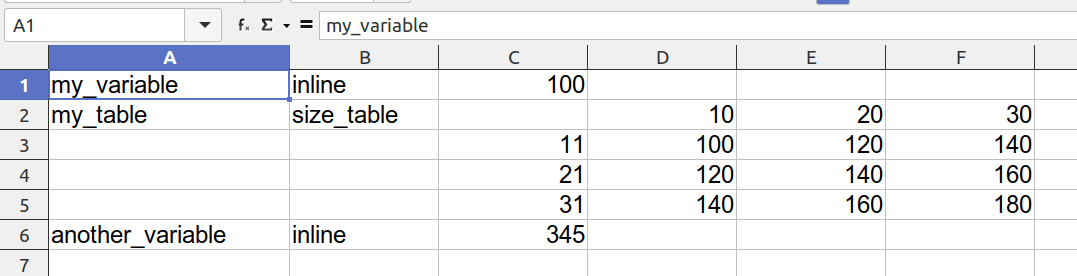
Here is an example of a spreadsheets with a few variables:
Formula variables spreadsheets
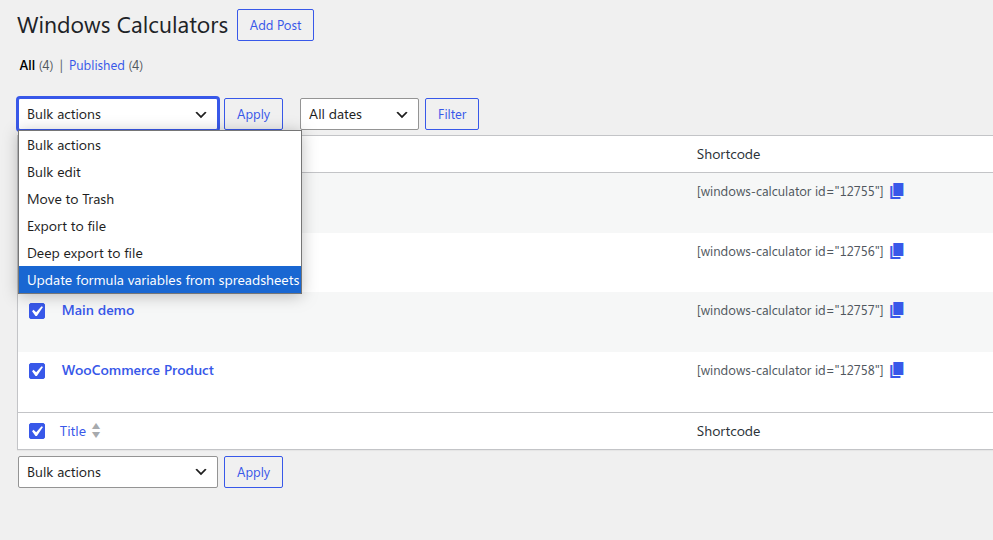
There is a bulk action to launch formula variables parsing process by the posts list.
Entities list bulk actions
Import
This is also possible to import formula variables from a file. To do that it's needed to fill special settings available with all formula variables settings.
Formula variables spreadsheets settings allow to use a source spreadsheets file with individual variables and formulas. To get the correct format of the file content, fill a few custom variables into the setting, save them, and then click «Download as CSV» button to see the columns and variables data markup.
Then the settings are handled, you can use the «Parse variables» button near the Formula variables spreadsheets source setting to update the variables setting.
Formula variables settings
Spreadsheets
Some settings support spreadsheets to be used as source of setting values. Supported sources are:
XLS (or XLSX)
CSV
Google Sheets
XLS and CSV files supports these source shapes:
Full URL to the file - file URL with domain. Example: https://example.com/files/prices.xls;
File URL without domain - that way the plugin will look for the file under the current domain. That could be helpful in case you have staging site clones. Example: /files/prices.xls;
Full path to the file - file path relative to server. Example: /home/example/public_html/files/prices.xls;
To parse a Google Spreadsheets make this file shared and available for reading by a link. Then use it as a spreadsheets source.
Except the source setting there is the «Spreadsheets target» settings group. It's settings are:
Page setting works for XLS and GoogleSheets. It allows to define a page number to parse. For CSV sources this setting isn't used cause CSV can have only one page;
Cell from setting means the top-left coordinate using the [LETTER][NUMBER] format, for example "A1". Spreadsheets parsing will be started from this point. This option is mandatory to define if you want to make spreadsheets parsing on;
Cell to setting allows to define the most bottom-right cell to be last parsed. It has the same format as the «From» setting, but it's optional. In case this setting is empty, the spreadsheets will be parsed until the end.
Formula variables settings
WooCommerce Product Settings
This is possible to create a WooCommerce product of a special type with an attached windows calculator within.
This is necessary to select a calculator and a combination which will be used for showing instead of the default WooCommerce product content. Doesn't matter which combination categories are selected for this calculator - there will be only the selected combination. All other calculator settings will be used as they are.
That's possible to define a price string just for the shop page. Product price will be taken from the calculator result.
WooCommerce product settings
Translation and Multilingual Mode
Translation
All default values of the plugin settings and the demo-preset are made in English. However, all these strings and labels can be changed right from the admin part of the plugin.
Strings used by the calculator in common can be found and changed under the Strings and Labels and Controls setting groups.
By the way, calculator not works with any specific size unit. It only depends on size ranges and tables you use with the plugin. Thous size unit could be cm, mm, inch, or any other. Only need to handle "Width" and "Height" string settings, because by-default they assume "cm" unit usage.
All other entities, as products and options, can be created and changed individually, because all of them are separate posts and terms.
Multilingual Mode
But what if you have a multilingual site and need to make your calculator be translated accordingly?
The most of the plugins what provide multilingual functionality only create duplicates of the posts and terms for each specific language. That way can lead to an issue of swamped database - in case of many different entities need to duplicate all of them for every required language.
Also, such approach have many issues with entities content binding and update. In case of changing one setting, its value should be passed into all duplicates correctly. Not all translation plugins can do this smoothly.
Moreover, there are significant issues with relations of entities. If some entity relies on other entities as setting values, that's necessary to swap these settings during using the setting value according to the active site language. This obliges the code to support different mechanisms of plugins providing multilingual functionality.
To avoid all these issues, Windows Calculator have an own addon and approach based on the native WordPress workflow to create multilingual calculators. The addon is a plugin called "Windows Calculator Multilingual" provided with the main plugin.
When the addon is active all text or text field type settings, post content field, and term name and description fields have an additional checkbox to make this specific field translatable.
Option settings pageOption value settings
Tick this checkbox for specific fields you'd want to make multilingual and save the settings.
Information about possibility to translate this field into a different language will be added into addon's languages/windows-calculator-multilingual.pot file.
At that stage this is possible to use any 3rd-party plugin for creating site translations. We'll use a good one Loco Translate plugin to handle translation files easily.
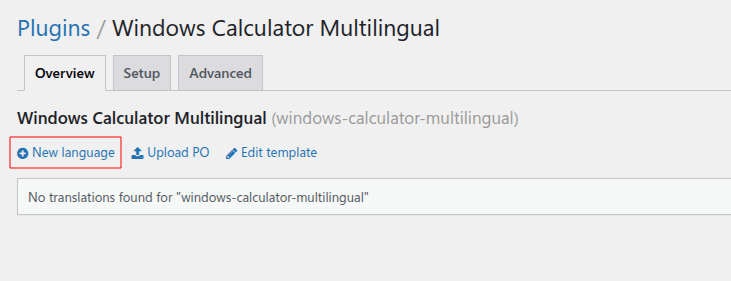
Go to "Loco Translate / Plugins / Windows Calculator Multilingual" to see the main plugin translate screen.
To add a language translation click the "New language" button.
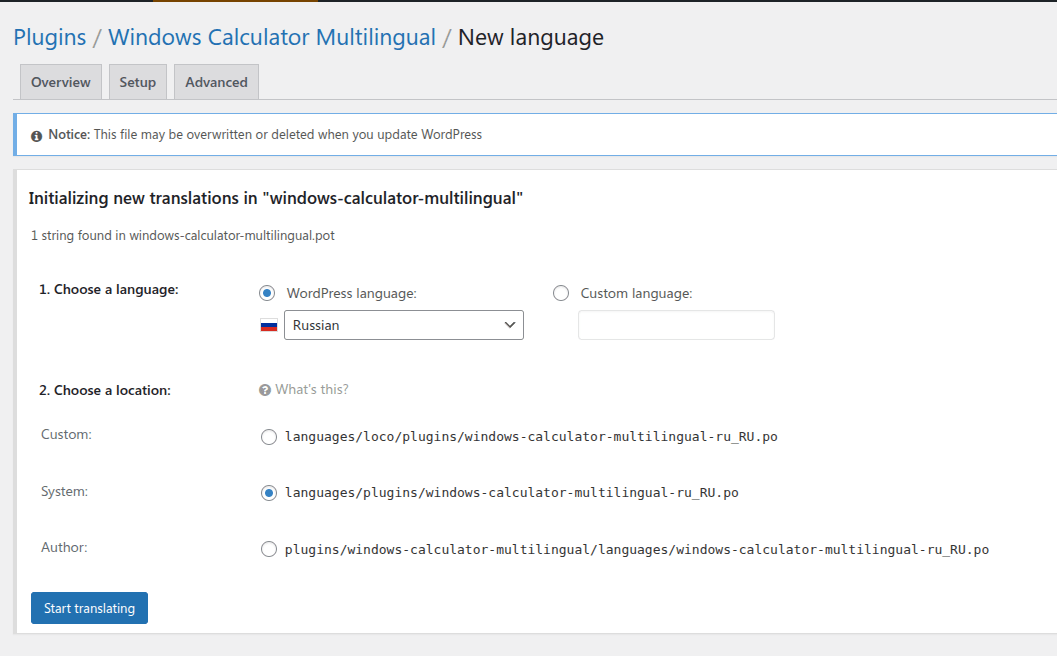
Loco Translate plugin page
Choose the required translation language first, and "Custom" or "System" for translation location to not store this file within the addon plugin folder to not lose it in case of plugin update or remove.
Loco Translate plugin page
On the next step click "Sync" button to obtain all translatable strings into the language translation file. Click this button each time you make any new fields translatable to obtain them.
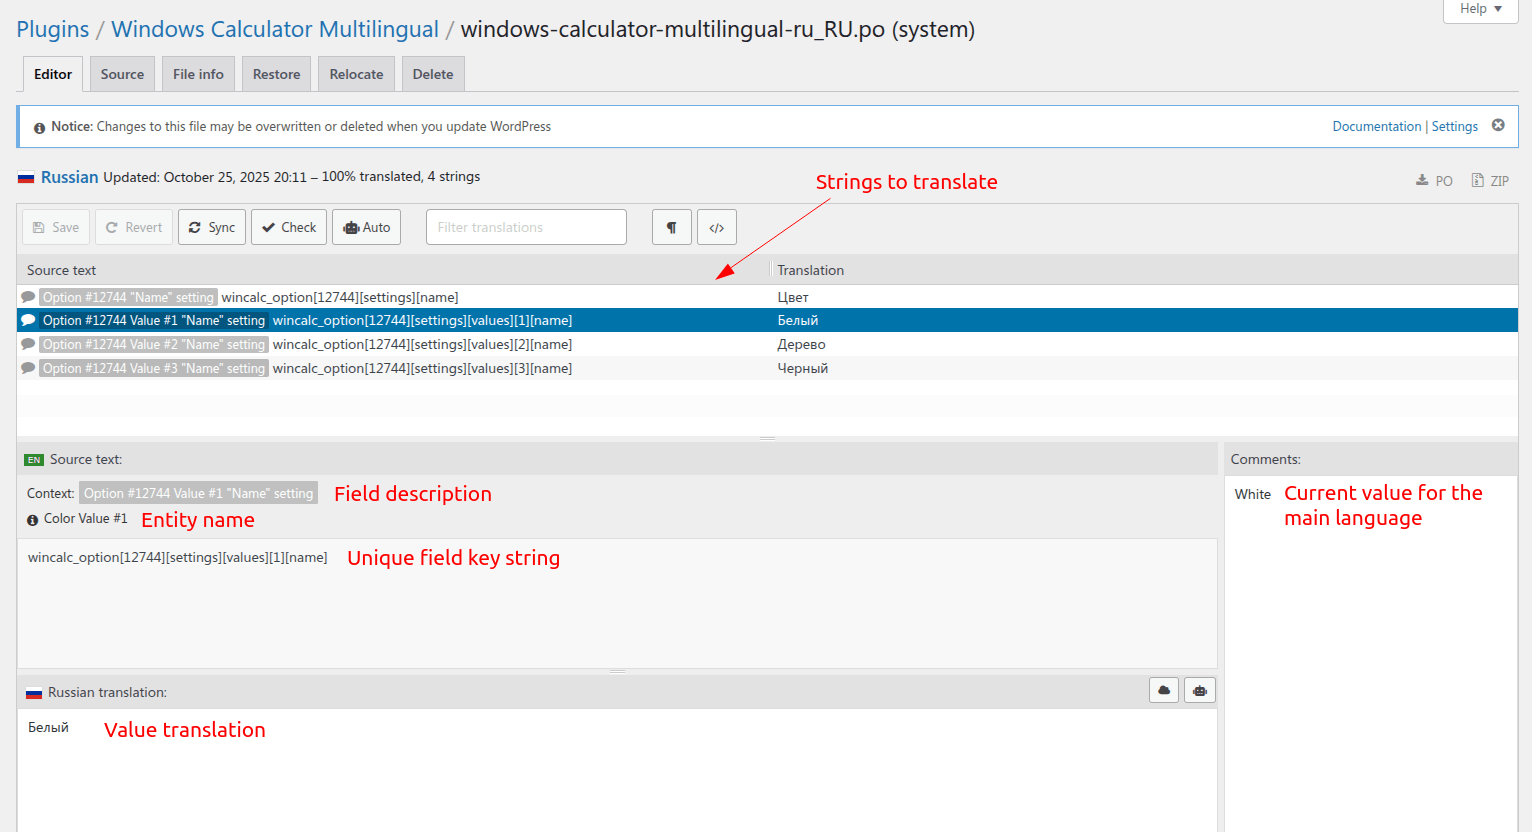
Each translatable field is a separate line having the next information:
Field description - what entity and field it is;
Entity name - post or term name with a sub-name if exists;
Current value for the main language in the comments section to see what text should be translated;
Unique key generated for that specific field. It's only used by the code to find the field translation;
Value translation to the required language.
Loco Translate specific language translation
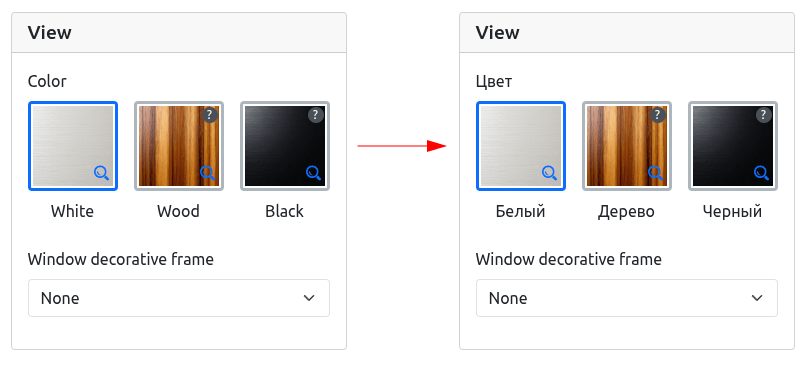
At the result, used field value will be automatically translated to the current site language using only the native WordPress mechanism.
Original and translated option
You can create as many calculator language translations as you need.
The main advantage of the method is clear and reliable entities storing without issues of the other approaches mentioned earlier.
How to change the site language?
Language switcher for the site can be provided using any 3rd-party plugins, like "Polylang" or "WPML". Such plugins also provides all necessary features to manage pages and URLs for different languages.
Please keep in mind, data about selected fields to be translatable is stored right within the multilingual addon under languages/windows-calculator-multilingual.pot file. In case of plugin remove or update, this information can be lost.
If case of losing this file you can find a backup under wp-content/languages/plugins/windows-calculator-multilingual.pot. You can revert this file into the addon's languages folder.
Migration from version 13 and older
Calculator
Older versions of the plugin had pre-defined and not-flexible templates, as Vertical and Steps. Now there is Default with a Sidebar template available, but has much more flexibility to combine a required layout and even use steps section with it. Use the Layout template setting to do this.
Also, older versions had a Tax setting to increase/decrease the final price by a specific percentage. Currently, Total rows setting can be used to provide such behavior, but much more flexible.
Options
Older plugin versions had a different approach to calculate the final price. That was possible to do only using the options with a different Type setting value. There was a list of possible operations, like Addition, Multiplication and so on. That was also possible to affect an option value by another option value using the Influence on setting. Currently, all these settings are removed.
However, the plugin can see if the removed Type setting is stored in the DB and converts it into the Formula variables setting values to have the close result. It works for options what was influence the combination price. Options what were affected other options can behave wrong!
Also, there is no Influenced combinations setting anymore, so the option modifies variables whatever combination is active.
Plugin admin side is also trying to migrate the old-way data into the Formula variables setting. However, in the admin side option don't know where are they used, so if that specific option was used as an individual product option, change its formula variable [total_price] to [product_price].
Saving the entity changes in the admin part will flush old-way settings from the DB, while new Formula variables will be kept.
Combinations
Earlier combination's Common pricing type mode had a built-in linear price changing. The sum of products "common price" was used as a starting price, and then it is multiplied by the area difference between the minimal and the current combination size. Currently, it has no price modifiers by default.
To re-create the old pricing behavior, add such formula variable setting for the specific combination: